By: Team Concierge™ Since: Aug 2018 Licence: MIT
- 1. Setting up
- 2. Design
- 3. Implementation
- 3.1. Undo/Redo feature
- 3.2. Adding a Booking
- 3.3. Rooms List Feature
- 3.4. Find Feature
- 3.5. Room Check-in/Checkout feature
- 3.6. Expense, Expenses and ExpenseType
- 3.7. Money
- 3.8. ServiceCommand
- 3.9. Login and Logout
- 3.10. Autocomplete: Ctrl, Alt
- 3.11. [Proposed] Command Archive feature
- 3.12. [Proposed] Data Encryption
- 3.13. Logging
- 3.14. Configuration
- 4. Documentation
- 5. Testing
- 6. Dev Ops
- Appendix A: Product Scope
- Appendix B: User Stories
- Appendix C: Use Cases
- Appendix D: Non Functional Requirements
- Appendix E: Glossary
- Appendix F: Product Survey
- Appendix G: Market Survey
- Appendix H: Instructions for Manual Testing
1. Setting up
1.1. Prerequisites
-
JDK
9or laterJDK 10on Windows will fail to run tests in headless mode due to a JavaFX bug. Windows developers are highly recommended to use JDK9. -
IntelliJ IDE
IntelliJ by default has Gradle and JavaFx plugins installed.
Do not disable them. If you have disabled them, go toFile>Settings>Pluginsto re-enable them.
1.2. Setting up the project in your computer
-
Fork this repo, and clone the fork to your computer
-
Open IntelliJ (if you are not in the welcome screen, click
File>Close Projectto close the existing project dialog first) -
Set up the correct JDK version for Gradle
-
Click
Configure>Project Defaults>Project Structure -
Click
New…and find the directory of the JDK
-
-
Click
Import Project -
Locate the
build.gradlefile and select it. ClickOK -
Click
Open as Project -
Click
OKto accept the default settings -
Open a console and run the command
gradlew processResources(Mac/Linux:./gradlew processResources). It should finish with theBUILD SUCCESSFULmessage.
This will generate all resources required by the application and tests.
1.3. Verifying the setup
-
Run the
seedu.address.MainAppand try a few commands -
Run the tests to ensure they all pass.
1.4. Configurations to do before writing code
1.4.1. Configuring the coding style
This project follows oss-generic coding standards. IntelliJ’s default style is mostly compliant with ours but it uses a different import order from ours. To rectify,
-
Go to
File>Settings…(Windows/Linux), orIntelliJ IDEA>Preferences…(macOS) -
Select
Editor>Code Style>Java -
Click on the
Importstab to set the order-
For
Class count to use import with '*'andNames count to use static import with '*': Set to999to prevent IntelliJ from contracting the import statements -
For
Import Layout: The order isimport static all other imports,import java.*,import javax.*,import org.*,import com.*,import all other imports. Add a<blank line>between eachimport
-
Optionally, you can follow the UsingCheckstyle.adoc document to configure Intellij to check style-compliance as you write code.
1.4.2. Updating documentation to match your fork
After forking the repo, the documentation will still have the SE-EDU branding and refer to the se-edu/addressbook-level4 repo.
If you plan to develop this fork as a separate product (i.e. instead of contributing to se-edu/addressbook-level4), you should do the following:
-
Configure the site-wide documentation settings in
build.gradle, such as thesite-name, to suit your own project. -
Replace the URL in the attribute
repoURLinDeveloperGuide.adocandUserGuide.adocwith the URL of your fork.
1.4.3. Setting up CI
Set up Travis to perform Continuous Integration (CI) for your fork. See UsingTravis.adoc to learn how to set it up.
After setting up Travis, you can optionally set up coverage reporting for your team fork (see UsingCoveralls.adoc).
| Coverage reporting could be useful for a team repository that hosts the final version but it is not that useful for your personal fork. |
Optionally, you can set up AppVeyor as a second CI (see UsingAppVeyor.adoc).
| Having both Travis and AppVeyor ensures your App works on both Unix-based platforms and Windows-based platforms (Travis is Unix-based and AppVeyor is Windows-based) |
1.4.4. Getting started with coding
When you are ready to start coding,
-
Get some sense of the overall design by reading Section 2.1, “Architecture”.
-
Take a look at [GetStartedProgramming].
2. Design
[NOTE] The diagrams in this section are intended to be updated only in v.1.5.
2.1. Architecture
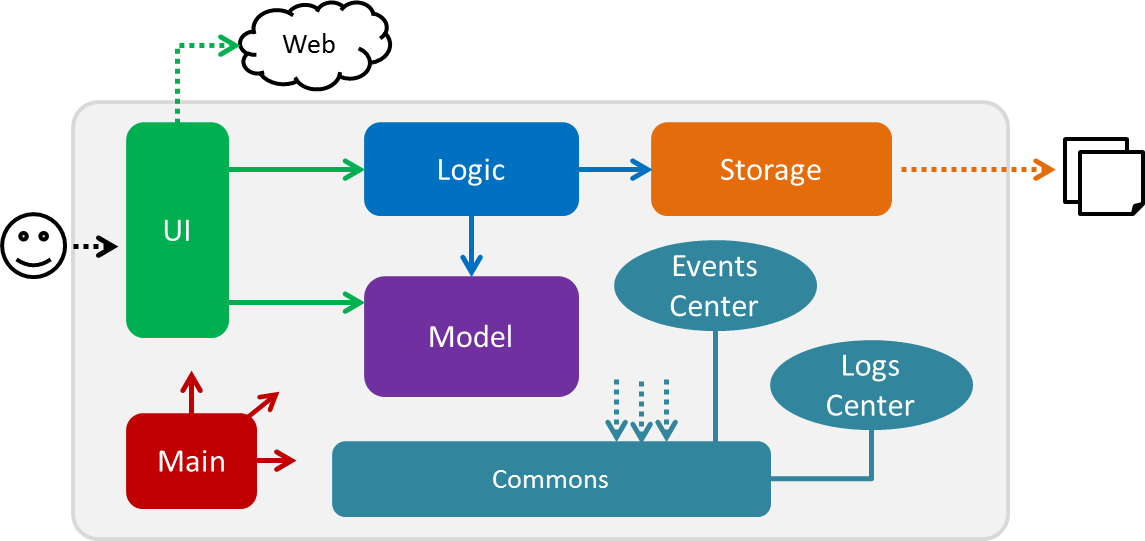
The Architecture Diagram given above explains the high-level design of the App. Given below is a quick overview of each component.
The .pptx files used to create diagrams in this document can be found in the diagrams folder. To update a diagram, modify the diagram in the pptx file, select the objects of the diagram, and choose Save as picture.
|
Main has only one class called MainApp. It is responsible for,
-
At app launch: Initializes the components in the correct sequence, and connects them up with each other.
-
At shut down: Shuts down the components and invokes cleanup method where necessary.
Commons represents a collection of classes used by multiple other components. Two of those classes play important roles at the architecture level.
-
EventsCenter: This class (written using Google’s Event Bus library) is used by components to communicate with other components using events (i.e. a form of Event Driven design) -
LogsCenter: Used by many classes to write log messages to the App’s log file.
The rest of the App consists of four components.
Each of the four components
-
Defines its API in an
interfacewith the same name as the Component. -
Exposes its functionality using a
{Component Name}Managerclass.
For example, the Logic component (see the class diagram given below) defines it’s API in the Logic.java interface and exposes its functionality using the LogicManager.java class.
Events-Driven nature of the design
The Sequence Diagram below shows how the components interact for the scenario where the user issues the command delete 1.

delete 1 command (part 1)
Note how the Model simply raises a ConciergeChangedEvent when Concierge data are changed, instead of asking the Storage to save the updates to the hard disk.
|
The diagram below shows how the EventsCenter reacts to that event, which eventually results in the updates being saved to the hard disk and the status bar of the UI being updated to reflect the 'Last Updated' time.
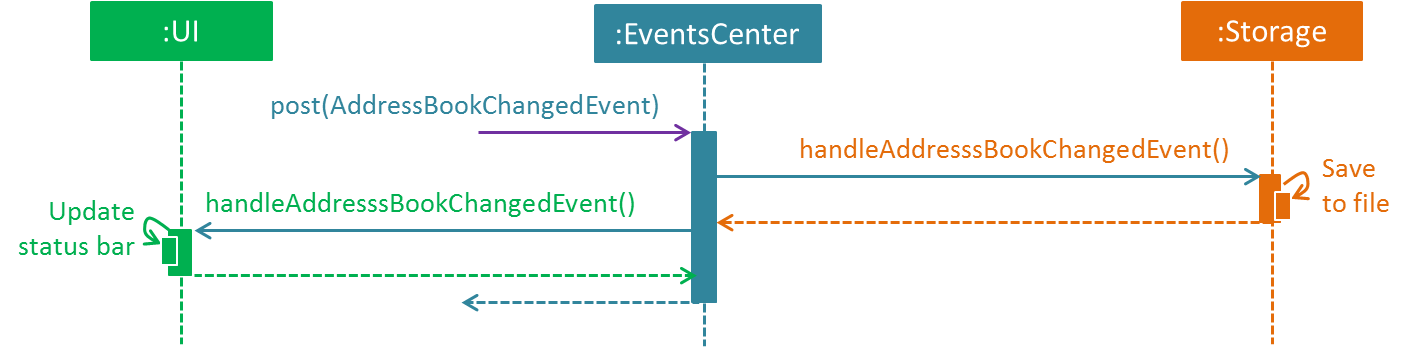
delete 1 command (part 2)
Note how the event is propagated through the EventsCenter to the Storage and UI without Model having to be coupled to either of them. This is an example of how this Event Driven approach helps us reduce direct coupling between components.
|
The sections below give more details of each component.
2.2. UI component
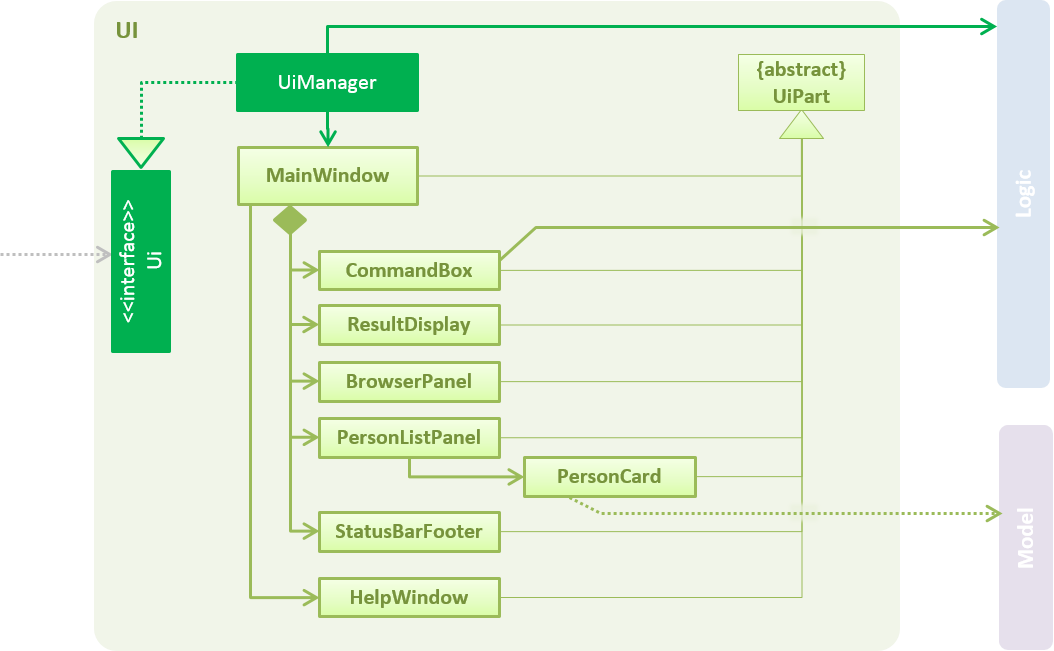
API : Ui.java
The UI consists of a MainWindow that is made up of parts e.g.CommandBox, ResultDisplay, PersonListPanel, StatusBarFooter, BrowserPanel etc. All these, including the MainWindow, inherit from the abstract UiPart class.
The UI component uses JavaFx UI framework. The layout of these UI parts are defined in matching .fxml files that are in the src/main/resources/view folder. For example, the layout of the MainWindow is specified in MainWindow.fxml
The UI component,
-
Executes user commands using the
Logiccomponent. -
Binds itself to some data in the
Modelso that the UI can auto-update when data in theModelchange. -
Responds to events raised from various parts of the App and updates the UI accordingly.
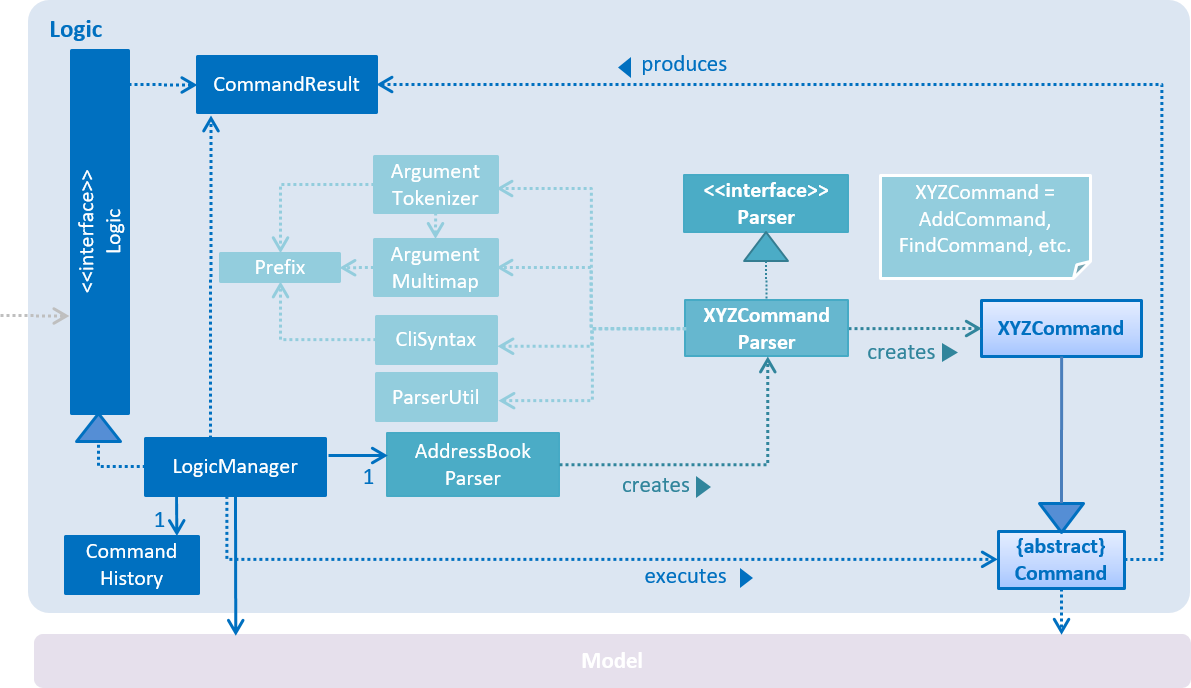
2.3. Logic component
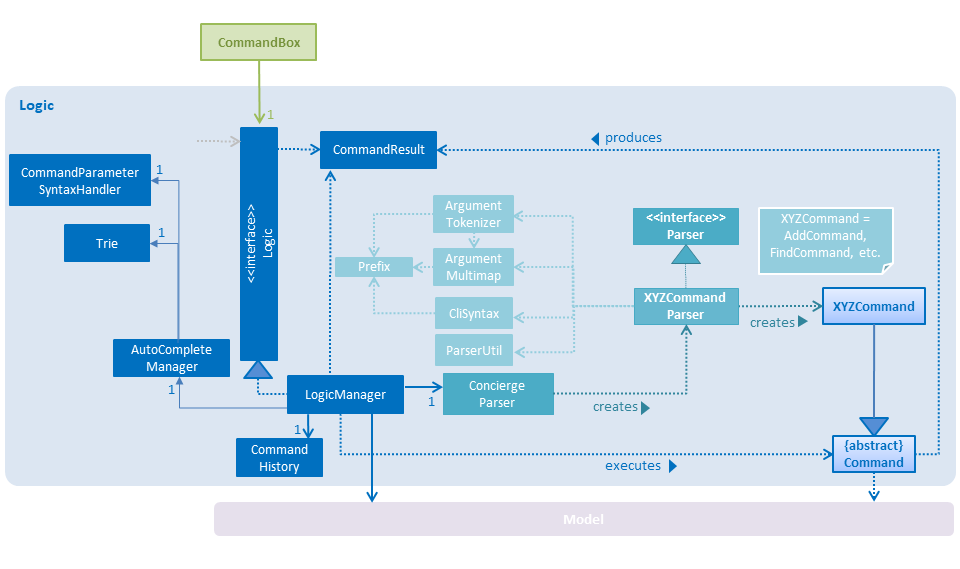
API :
Logic.java
-
Logicuses theConciergeParserclass to parse the user command. -
This results in a
Commandobject which is executed by theLogicManager. -
The command execution can affect the
Model(e.g. adding a guest) and/or raise events. -
The result of the command execution is encapsulated as a
CommandResultobject which is passed back to theUi.
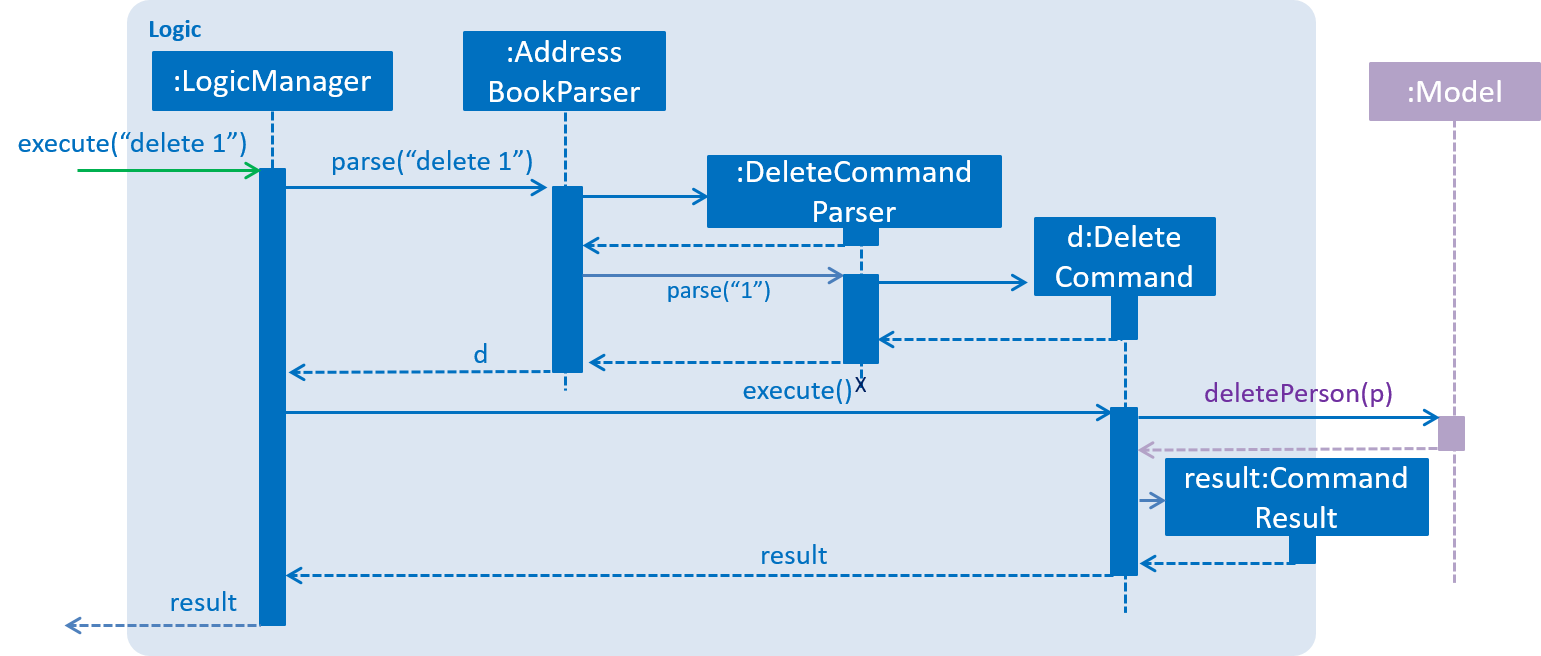
Given below is the Sequence Diagram for interactions within the Logic component for the execute("delete 1") API call.
delete 1 Command2.4. Model component
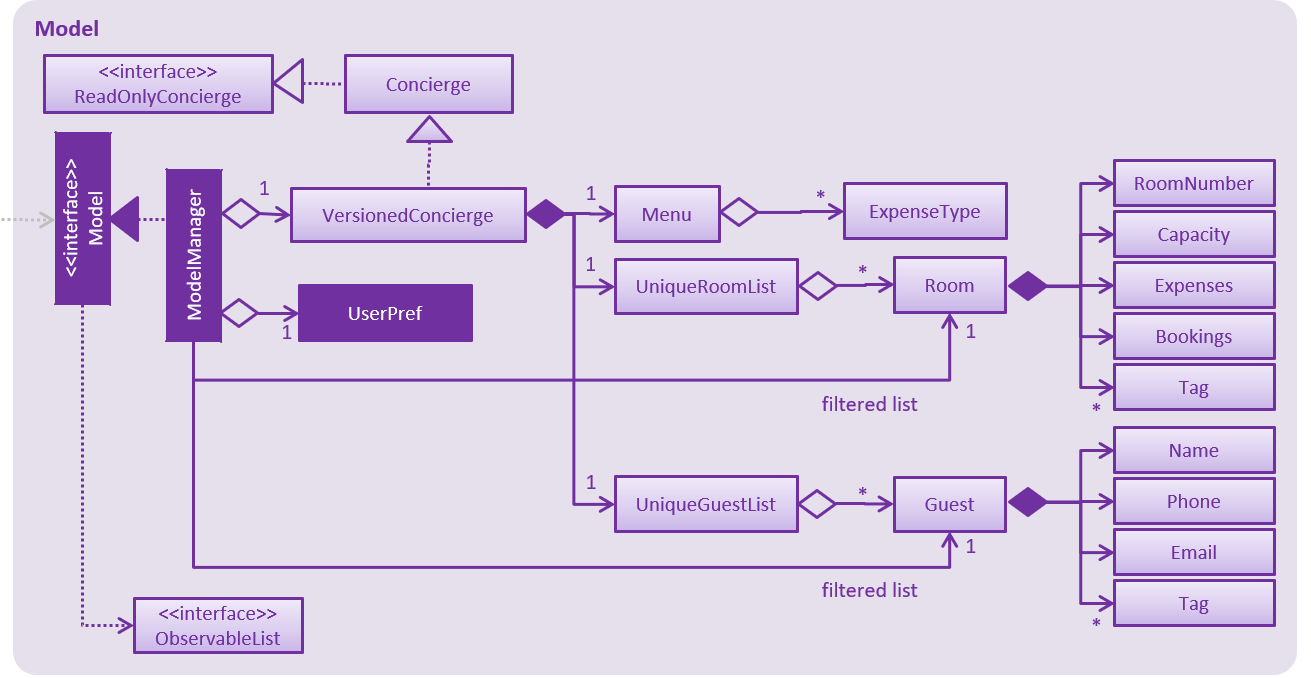
API : Model.java
The Model,
-
stores a
UserPrefobject that represents the user’s preferences. -
stores Concierge data.
-
exposes an unmodifiable
ObservableList<Guest>that can be 'observed' e.g. the UI can be bound to this list so that the UI automatically updates when the data in the list change. -
does not depend on any of the other three components.
As a more OOP model, we can store a Tag list in Concierge, which Guest can reference. This would allow Concierge to only require one Tag object per unique Tag, instead of each Guest needing their own Tag object. An example of how such a model may look like is given below. Only UniqueGuestList is shown for simplicity.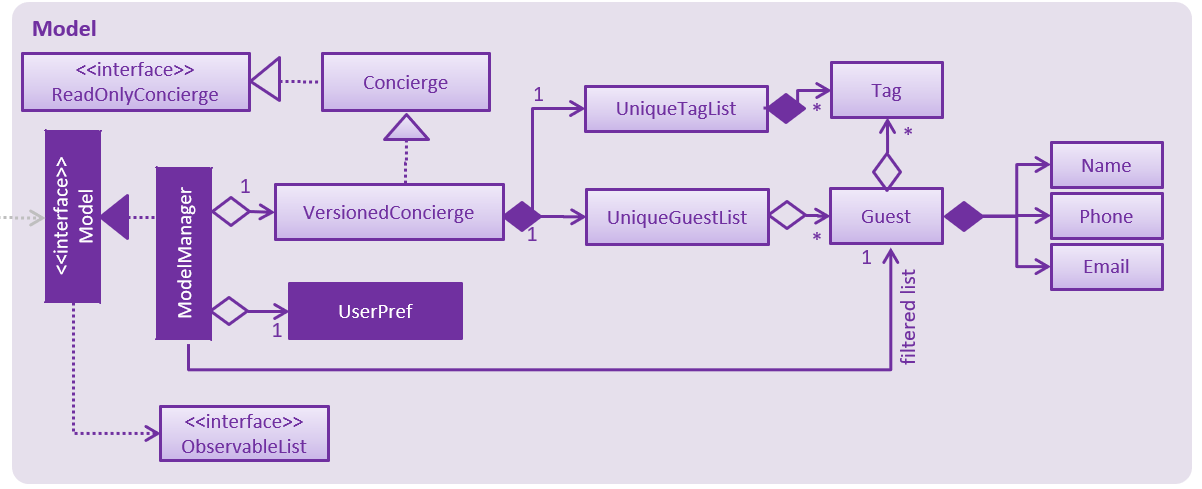
|
2.5. Storage component
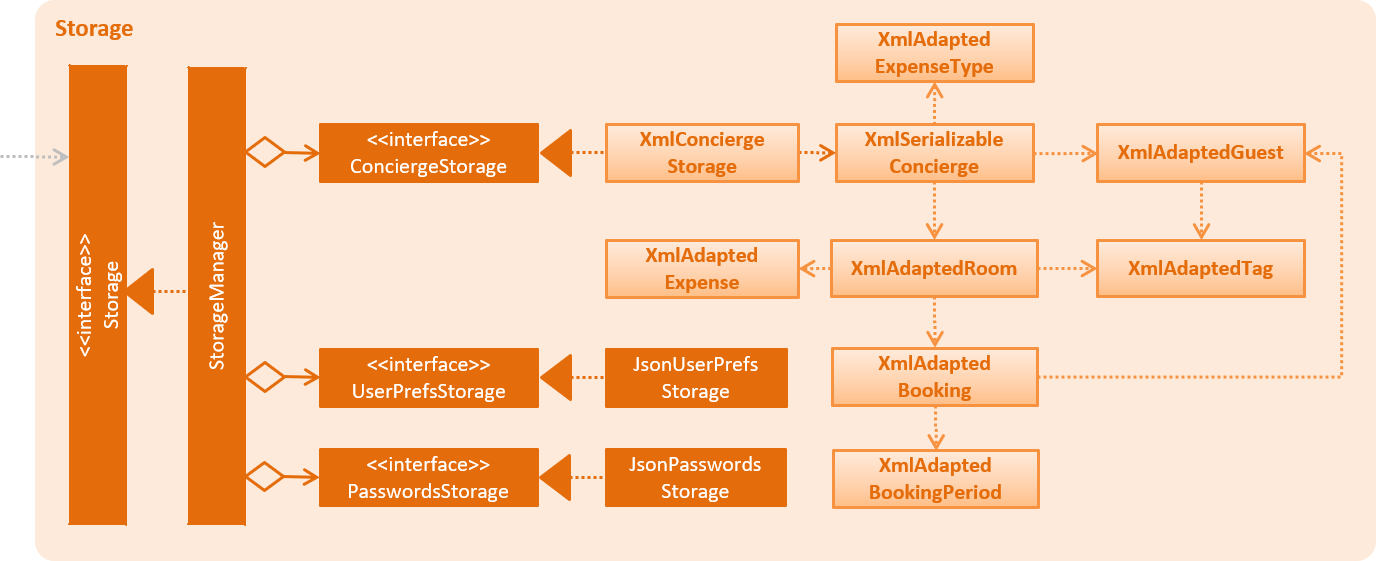
API : Storage.java
The Storage component,
-
can save
UserPrefobjects in json format and read it back. -
can save Concierge data in xml format and read it back.
2.6. Common classes
Classes used by multiple components are in the seedu.addressbook.commons package.
3. Implementation
This section describes some noteworthy details on how certain features are implemented.
3.1. Undo/Redo feature
| Diagrammatic references to "AddressBook" are intended to be removed in v.1.5. ==== Current Implementation |
The undo/redo mechanism is facilitated by VersionedConcierge.
It extends Concierge with an undo/redo history, stored internally as an conciergeStateList and currentStatePointer.
Additionally, it implements the following operations:
-
VersionedConcierge#commit()— Saves the current Concierge state in its history. -
VersionedConcierge#undo()— Restores the previous Concierge state from its history. -
VersionedConcierge#redo()— Restores a previously undone Concierge state from its history.
These operations are exposed in the Model interface as Model#commitConcierge(), Model#undoConcierge() and Model#redoConcierge() respectively.
Given below is an example usage scenario and how the undo/redo mechanism behaves at each step.
Step 1. The user launches the application for the first time. The VersionedConcierge will be initialized with the initial Concierge state, and the currentStatePointer pointing to that single Concierge state.

Step 2. The user executes delete 5 command to delete the 5th guest in Concierge. The delete command calls Model#commitConcierge(), causing the modified state of Concierge after the delete 5 command executes to be saved in the conciergeStateList, and the currentStatePointer is shifted to the newly inserted Concierge state.
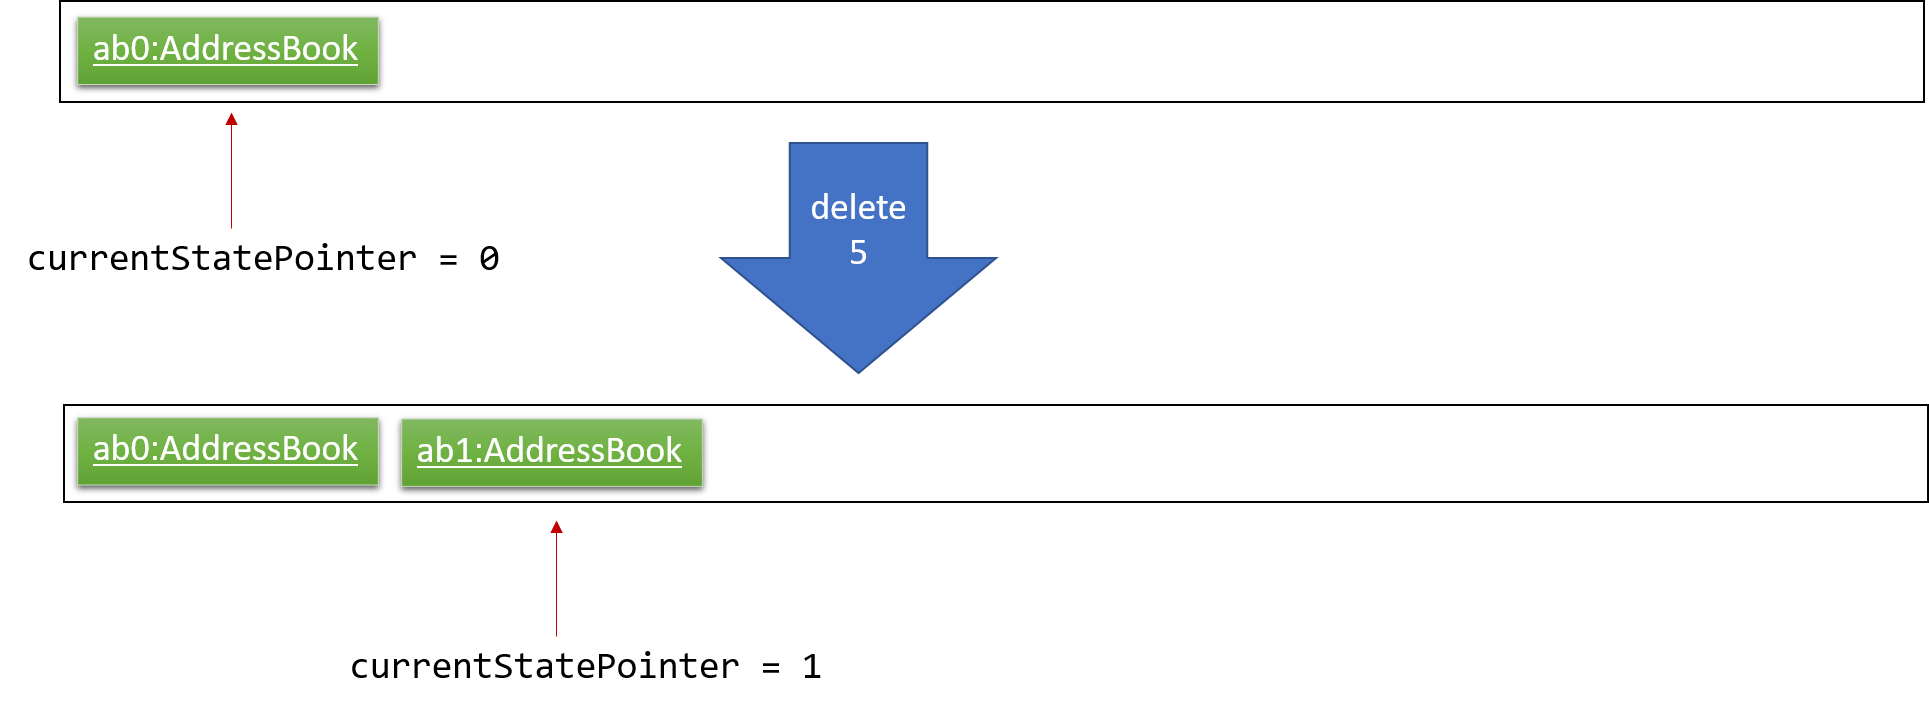
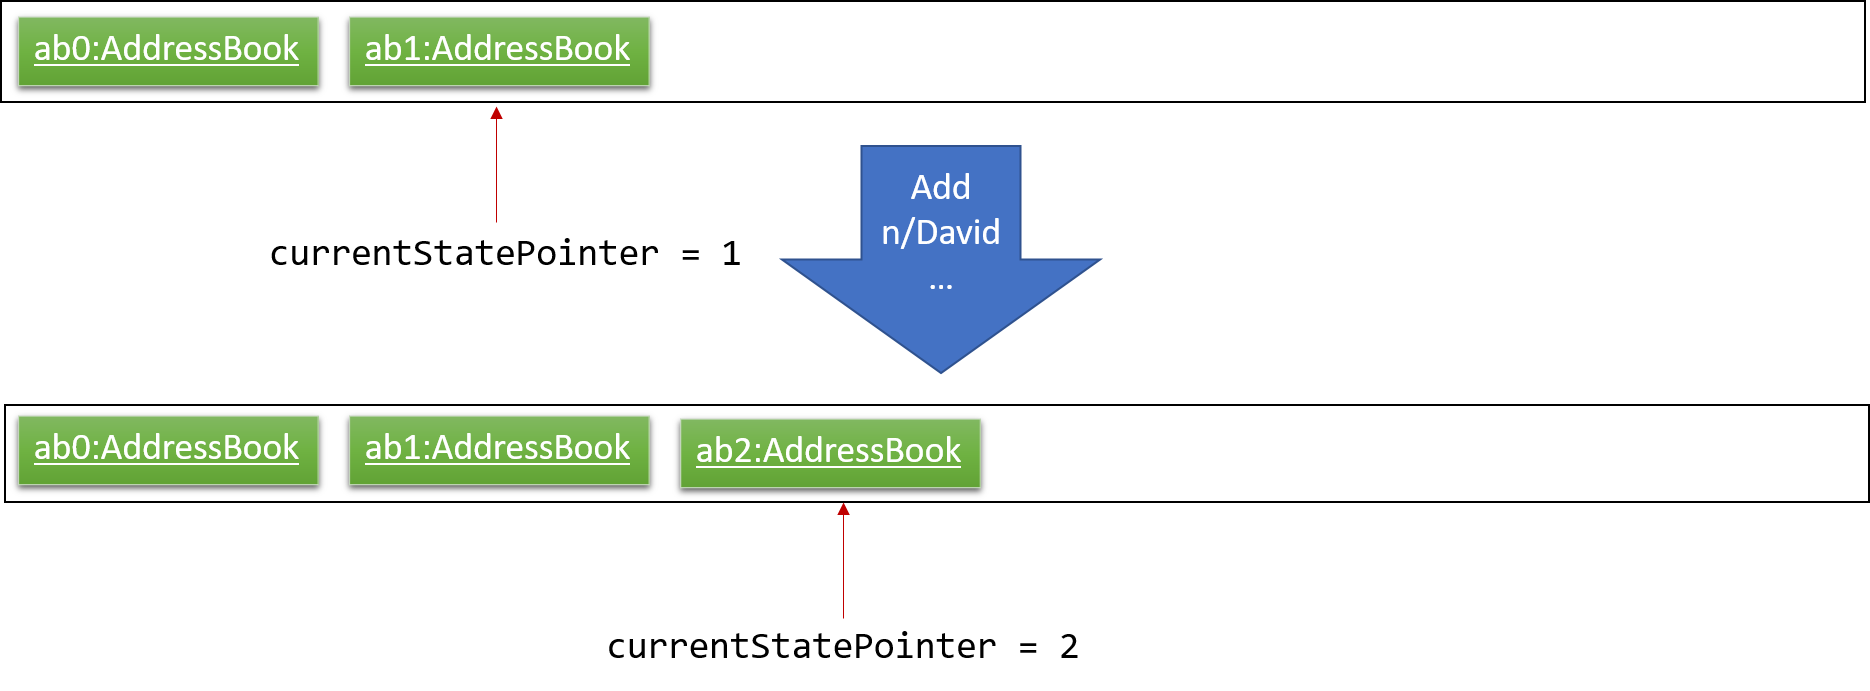
Step 3. The user executes add n/David … to add a new guest. The add command also calls Model#commitConcierge(), causing another modified Concierge state to be saved into the conciergeStateList.
If a command fails its execution, it will not call Model#commitConcierge(), so Concierge state will not be saved into the conciergeStateList.
|
Step 4. The user now decides that adding the guest was a mistake, and decides to undo that action by executing the undo command. The undo command will call Model#undoConcierge(), which will shift the currentStatePointer once to the left, pointing it to the previous Concierge state, and restores Concierge to that state.
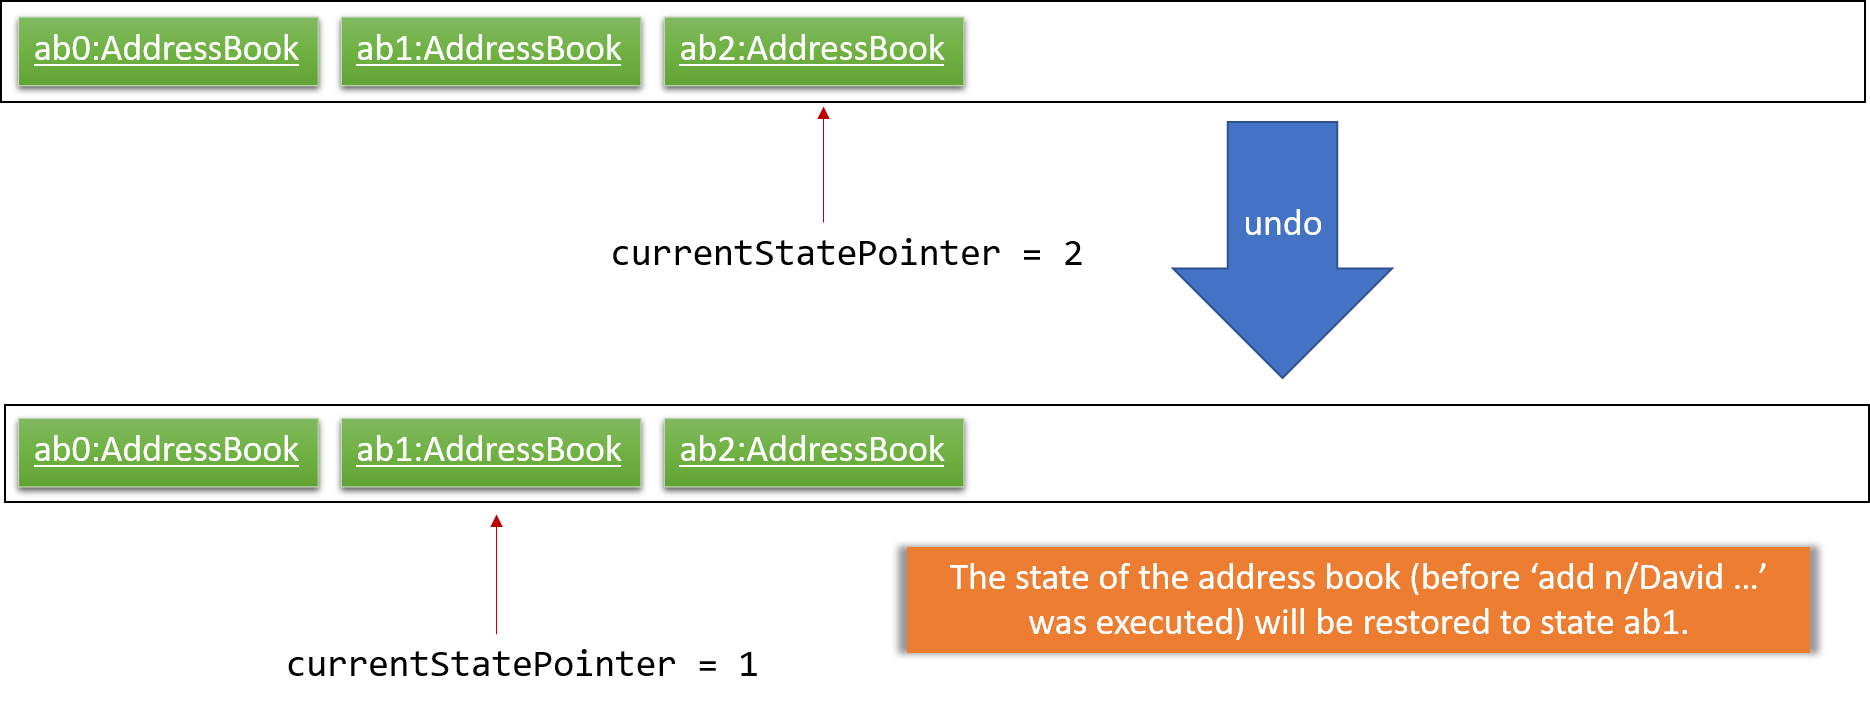
If the currentStatePointer is at index 0, pointing to the initial Concierge state, then there are no previous Concierge states to restore. The undo command uses Model#canUndoConcierge() to check if this is the case. If so, it will return an error to the user rather than attempting to perform the undo.
|
The following sequence diagram shows how the undo operation works:
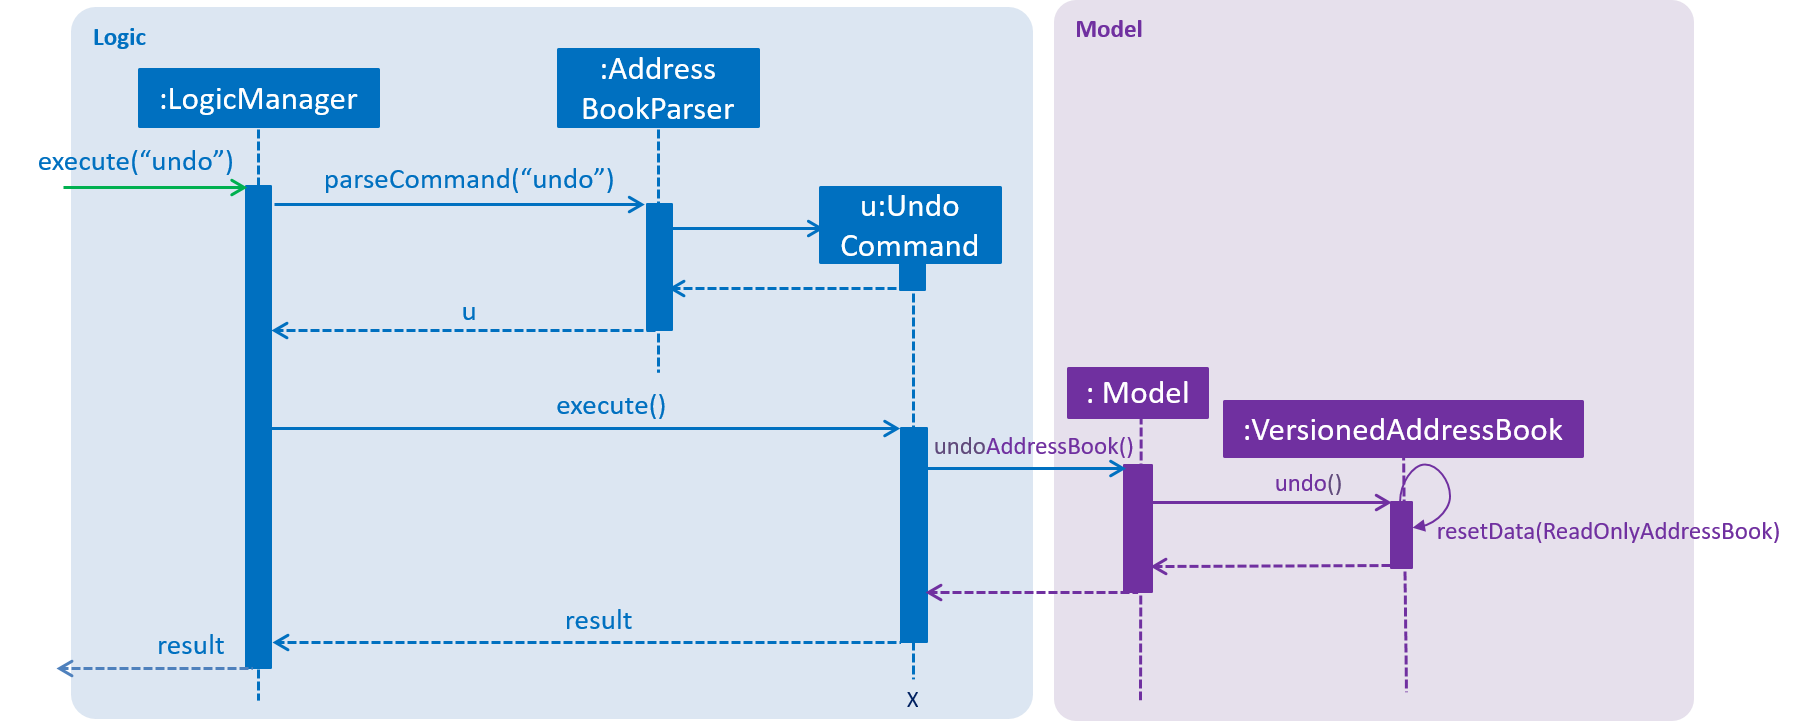
The redo command does the opposite — it calls Model#redoConcierge(), which shifts the currentStatePointer once to the right, pointing to the previously undone state, and restores Concierge to that state.
If the currentStatePointer is at index conciergeStateList.size() - 1, pointing to the latest Concierge state, then there are no undone Concierge states to restore. The redo command uses Model#canRedoConcierge() to check if this is the case. If so, it will return an error to the user rather than attempting to perform the redo.
|
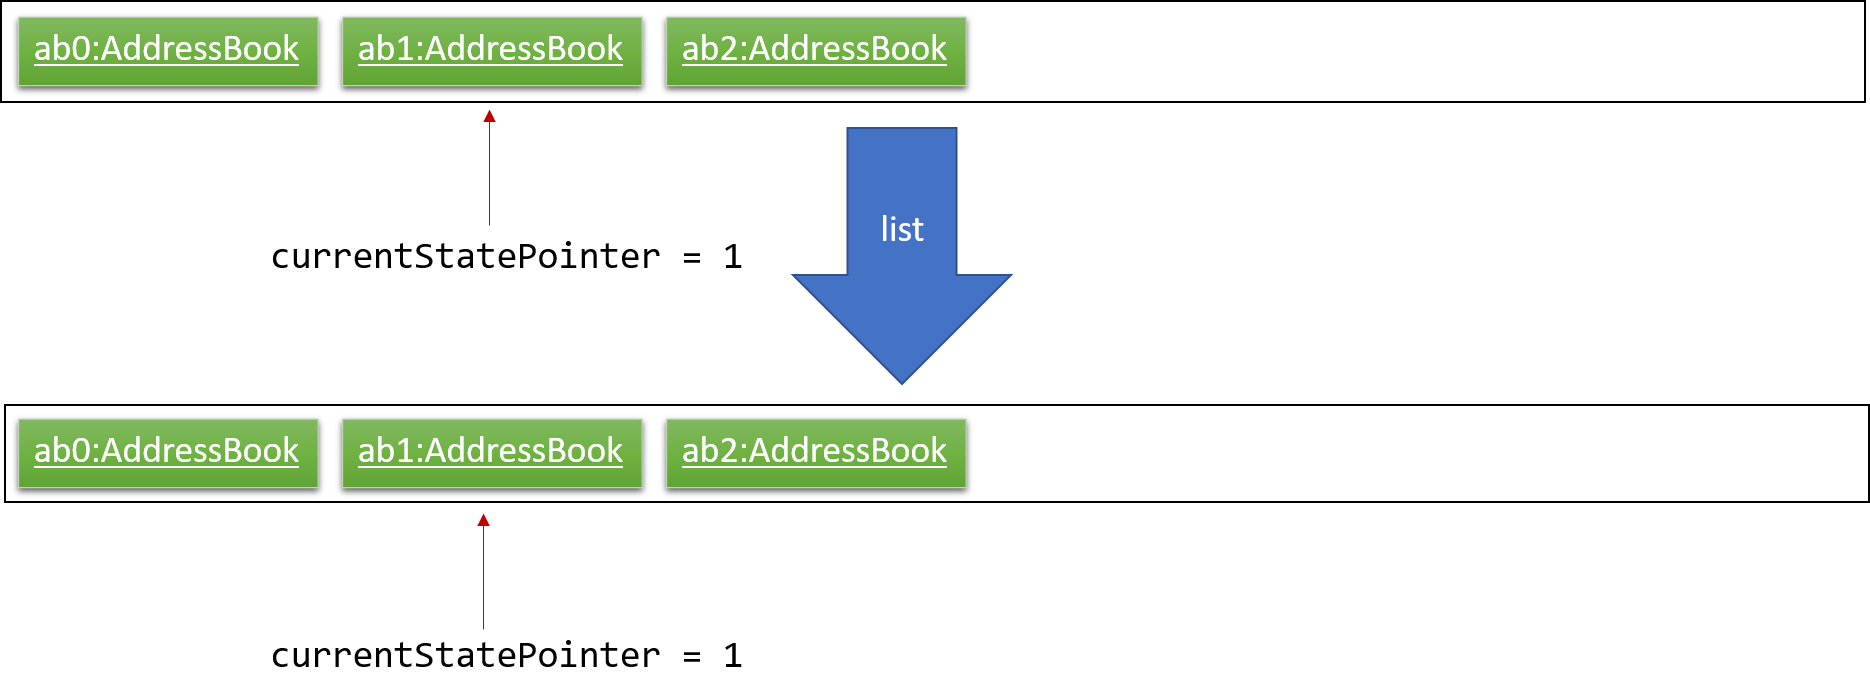
Step 5. The user then decides to execute the command list. Commands that do not modify Concierge, such as list, will usually not call Model#commitConcierge(), Model#undoConcierge() or Model#redoConcierge(). Thus, the conciergeStateList remains unchanged.
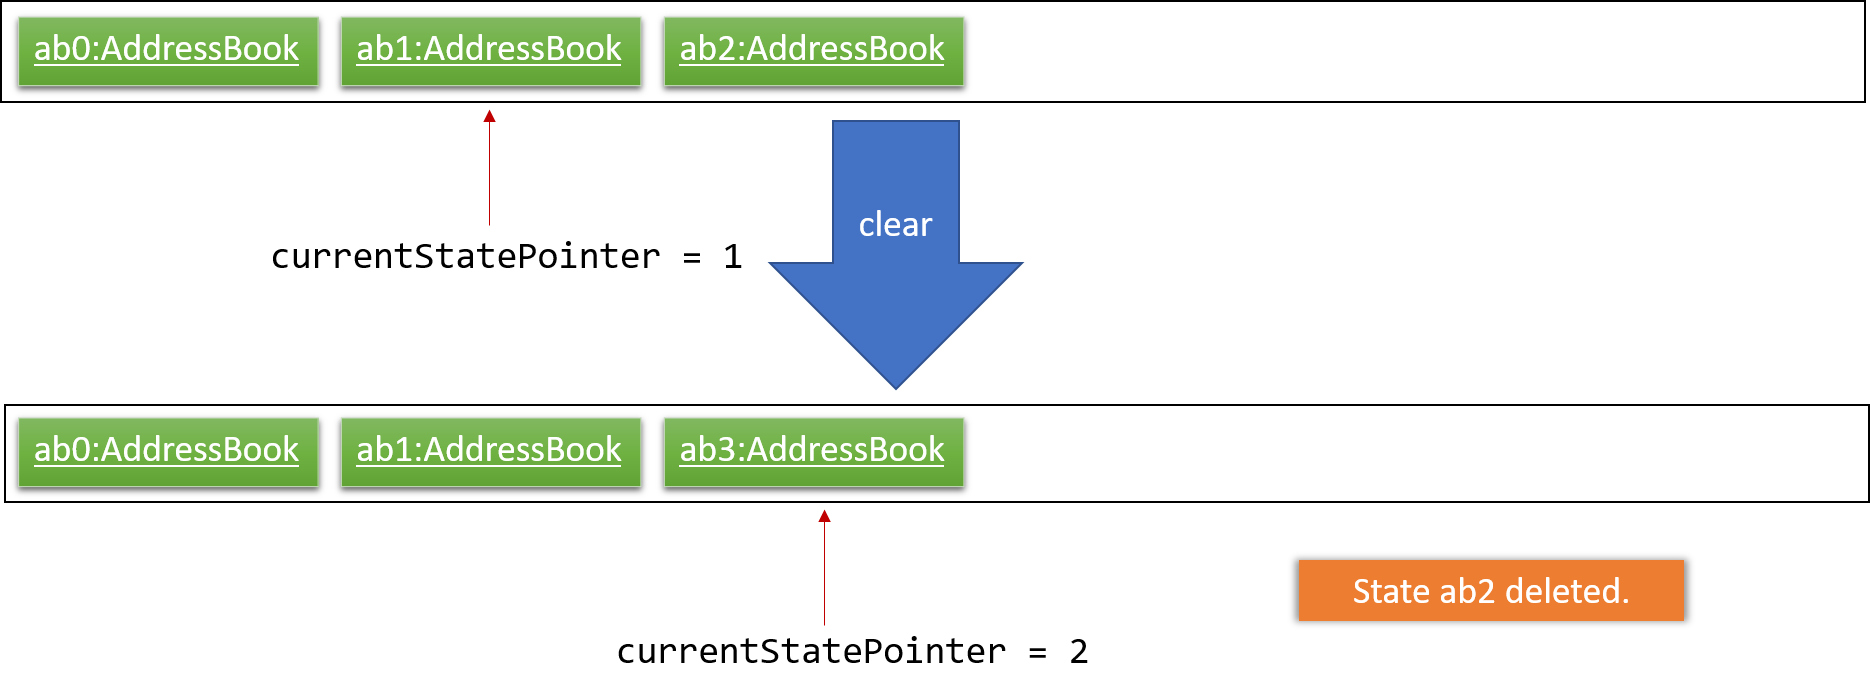
Step 6. The user executes clear, which calls Model#commitConcierge(). Since the currentStatePointer is not pointing at the end of the conciergeStateList, all Concierge states after the currentStatePointer will be purged. We designed it this way because it no longer makes sense to redo the add n/David … command. This is the behavior that most modern desktop applications follow.
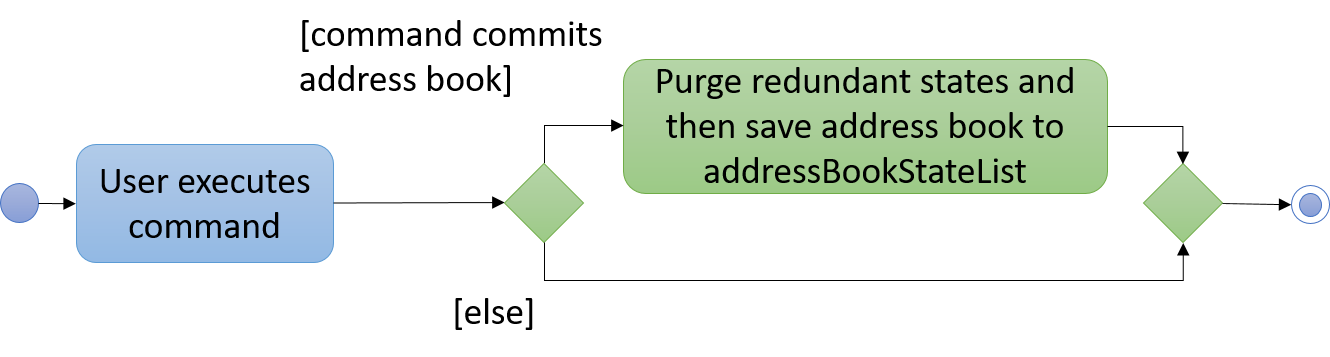
The following activity diagram summarizes what happens when a user executes a new command:
3.1.1. Design Considerations
Aspect: How undo & redo executes
-
Alternative 1 (current choice): Saves the entire Concierge.
-
Pros: Easy to implement.
-
Cons: May have performance issues in terms of memory usage.
-
-
Alternative 2: Individual command knows how to undo/redo by itself.
-
Pros: Will use less memory (e.g. for
delete, just save the guest being deleted). -
Cons: We must ensure that the implementation of each individual command are correct.
-
Aspect: Data structure to support the undo/redo commands
-
Alternative 1 (current choice): Use a list to store the history of Concierge states.
-
Pros: Easy for new Computer Science student undergraduates to understand, who are likely to be the new incoming developers of our project.
-
Cons: Logic is duplicated twice. For example, when a new command is executed, we must remember to update both
HistoryManagerandVersionedConcierge.
-
-
Alternative 2: Use
HistoryManagerfor undo/redo-
Pros: We do not need to maintain a separate list, and just reuse what is already in the codebase.
-
Cons: Requires dealing with commands that have already been undone: We must remember to skip these commands. Violates Single Responsibility Principle and Separation of Concerns as
HistoryManagernow needs to do two different things.
-
3.2. Adding a Booking
The add command is used by the receptionist to add the guest to the hotel,
and assign him a room.
3.2.1. Current Implementation
We currently accept a Guest, RoomNumber and BookingPeriod
as parameters for the AddCommand constructor. An example of its usage:
add n/Madith p/83141592 e/madith@themyth.com r/041 from/29/11/2018 to/ 03/12/2018
The parsing of the AddCommand is very similar to what was already
implemented in AddressBook4. More parameters were added, namely the
RoomNumber and BookingPeriod. These are parsed to create the respective
objects - Guest, RoomNumber and BookingPeriod.
-
In v2.0, users can enter a start date and duration to specify their booking period.
As in AddressBook4, the Logic component parses the AddCommand, and the
Model handles its execution.
-
In the
Model, theGuestis no longer added to Concierge. It was previously the case in AddressBook4. -
A new
Bookingobject is created with theGuestandBookingPeriodas its parameters. -
This
Bookingis then added to theRoomwith theRoomNumberspecified. EveryRoommaintains aSortedSet<Booking>which is encapsulated in theBookings(plural) class.
An Activity Diagram for the execution of AddCommand#execute is shown below.
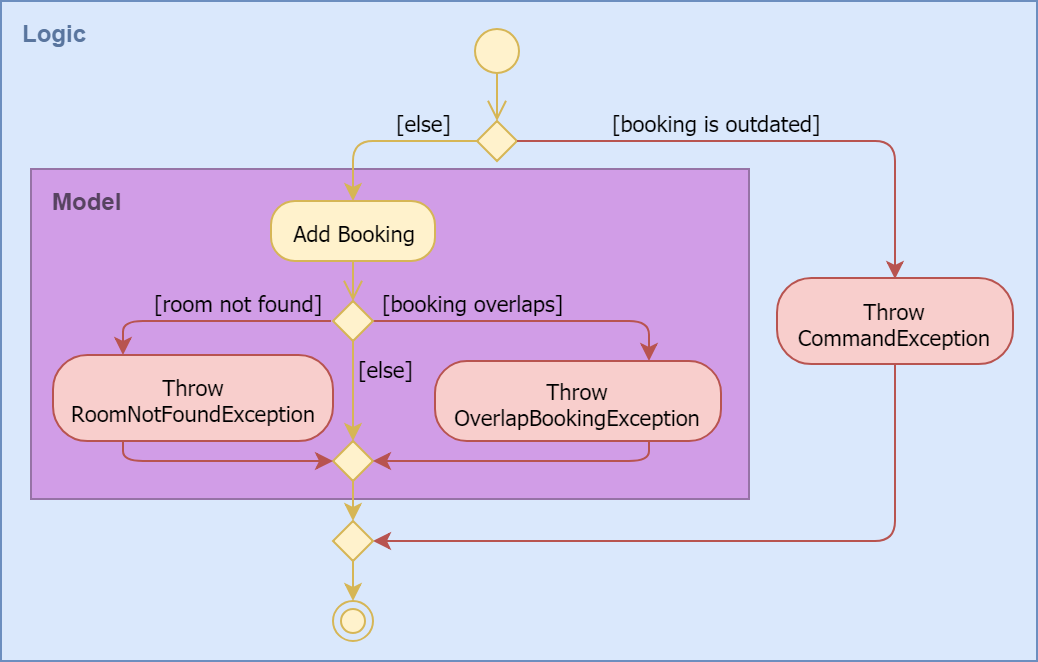
The AddCommandParser already checks that ROOM_NUMBER is a valid
string from 001 to 100, and the initialisation of Concierge checks that
there are 100 rooms. The RoomNotFoundException is not expected to occur
for any user input, but is left there as a defensive measure.
|
3.2.2. Design Considerations
Aspect: Check for outdated bookings
Outdated bookings are those which have a start date before today. Concierge
disallows users to add outdated bookings.
-
Alternative 1 (current choice): Do the check in
AddCommand#execute-
Pros: Very easy to implement. A parameter check in the
executemethod will suffice. Will only affect theAddCommandSystemTest. -
Cons: The actual
Model#addBookingdoes not do any check on theBookingPeriodbeing outdated, opening the possibly of outdatedBookings being added from via other commands.
-
-
Alternative 2: Do the check in
Room#addBooking-
Pros: Centralises exceptions thrown related to bookings in the
Bookingclass. Increases the cohesiveness of this class. -
Cons: All the existing tests and sample data calling the
addBookingmethod with outdated bookings have to be changed. It also becomes difficult to do unit tests on checking in bookings which are outdated but not expired, since these bookings can no longer be added to the model.
-
Aspect: Reduce coupling between Room and Guest
Semantically, we can observe a strong coupling and dependency between Room
and Guest. A Room contains a Guest, and a Guest also has a Room.
Maintaining this coupling allows for very quick lookup both ways, either
given a Guest (which is common at the reception desk) or given a Room
(which is common for housekeeping).
-
Alternative 1 (current choice): Add
Guestas a field inRoom-
Pros: An efficient way for managing bookings. Receptionist can quickly determine if the
Roomis free to book. Lookup time forGuestnot expected to increase greatly, sinceRooms are not expected to have a large number of advanced bookings made. -
Cons: Difficult to find the
Roomgiven theGuest. When aGuesthas made an advanced booking and wishes to cancel it, we have to search through all theRooms. Nevertheless, we expect most guests to be aware of their rooms.
-
-
Alternative 2: Add
Roomas a field inGuest-
Pros: Very customer-centric design. Centralises all the information about the
Guest, includingBookings made andExpenses incurred. -
Cons: Making a new
Bookingwith aGuestis highly inefficient.Bookinginformation is now scattered across individualGuests.-
[v1.4] On top of the list of rooms, we maintain a separate list of checked-in guests. This list does not retain any booking information, as it is meant to for a quick lookup of the guests' particulars.
-
-
3.3. Rooms List Feature
The rooms list feature builds upon, and reuses functions from the ;originally implemented ListCommand.
The Activity UML Diagram for the current implementation of ListCommand is as follows:
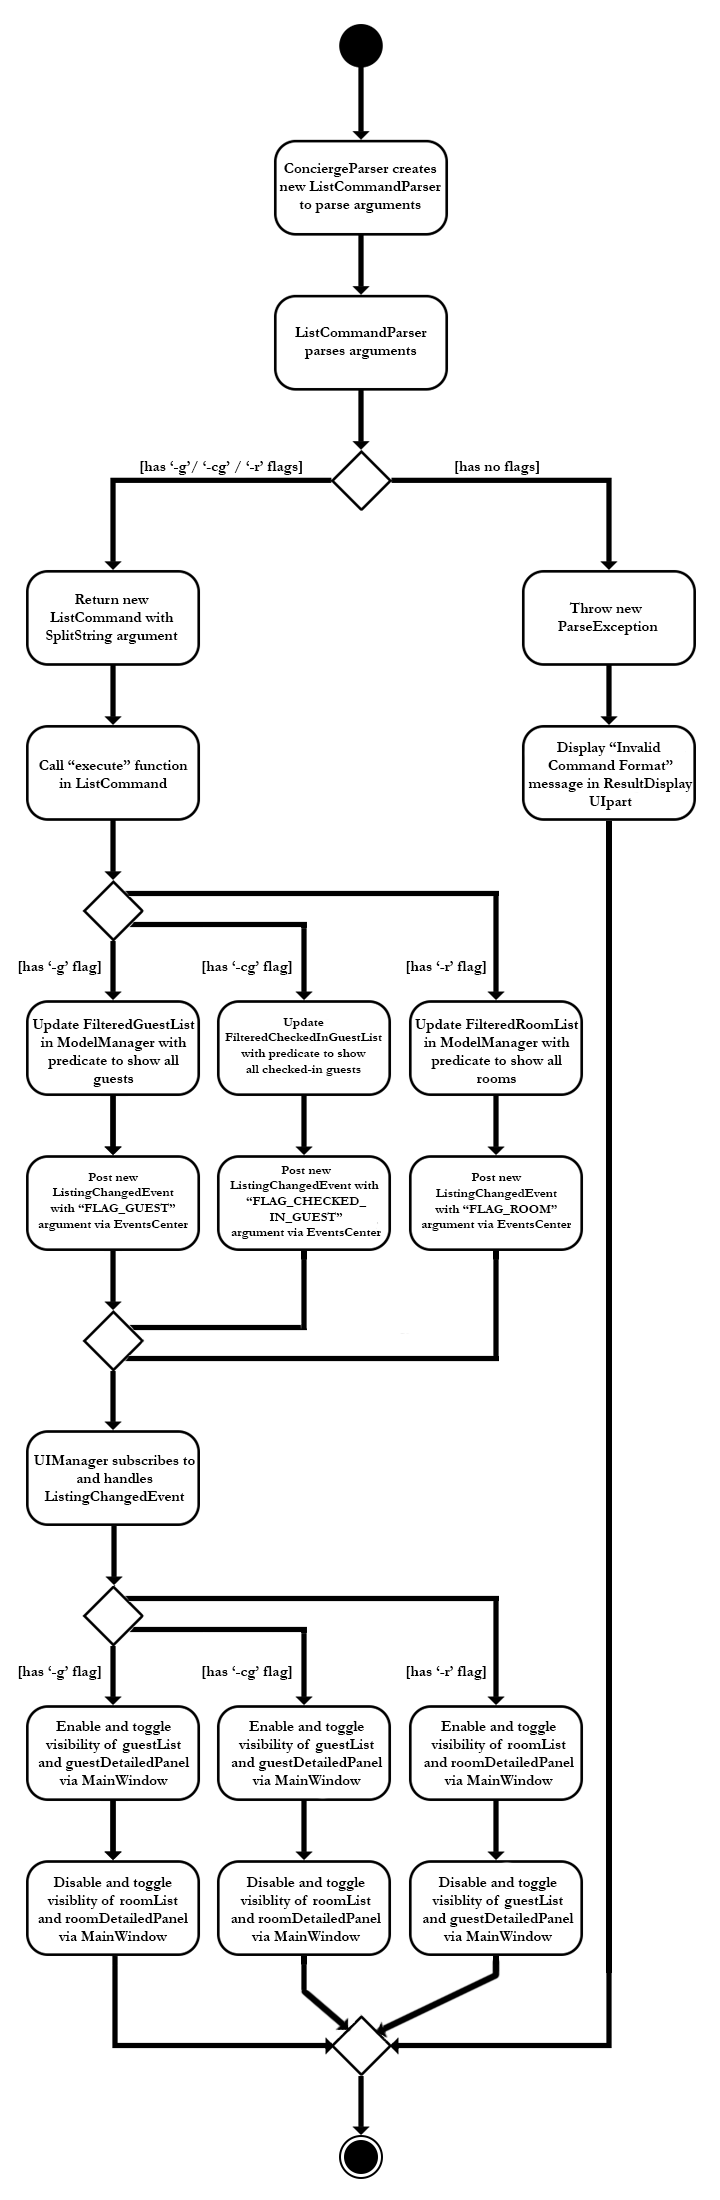
3.3.1. Current Implementation
The list function is facilitated by a modified ListCommand class, of which the input from the CommandBox is parsed by a ListCommandParser class.
The list function now requires a flag after the 'list' command. Below are the two allowed list commands:
-
list -g- Lists all guests. -
list -cg- Lists all checked-in guests. -
list -r- Lists all rooms.
A ListCommandParser class was created to obtain and compare the flags from inputs, which required a different approach to the rest of the commands. The input string is simply split using a String function, obtaining an array of strings, of which the flags will be at index 1.
Modification of existing FXML files, and creation of new FXML files was done to achieve separate listing of guests and rooms, and the browser panel was replaced with a panel to focus on, and display more detailed information on the selected guest/room.
In order to stack the UI elements on top of one another to reuse and display the separate lists under the same column, modifications were made to the MainWindow.fxml file.
The GuestListPanel and RoomListPanel each has a "VBox" element encapsulating them, which visibility is toggled and the element itself enabled or disabled based on the flag that was obtained from the parser. This feature extends to the GuestDetailedPanel and RoomDetailedPanel and is achieved in the same way.
3.3.2. Design Considerations
Aspect: How to display each list
-
Alternative 1 : Maintain two columns on the MainWindow UI to display both rooms and guests
-
Pros: Easier to modify UI by adding on instead of modifying and replacing, and modifications in the future will not be too tedious.
-
Cons: UI looks cluttered with an empty column when not displaying the other, not an efficient use of screen space.
-
-
Alternative 2 (current choice): Separately display the two lists within the same MainWindow UI space/column.
-
Pros: Cleaner looking, fully utilises empty spaces. Better visual feedback from commands as inputs.
-
Cons: Requires heavy modification of MainWindow UI files, future features must stick with the restriction of having a list of either guests or rooms.
-
3.4. Find Feature
The Find feature expands upon the originally implemented FindCommand, allowing for the searching of both rooms and guests, with several filters.
The Activity UML Diagram for the current implementation of FindCommand is as follows:
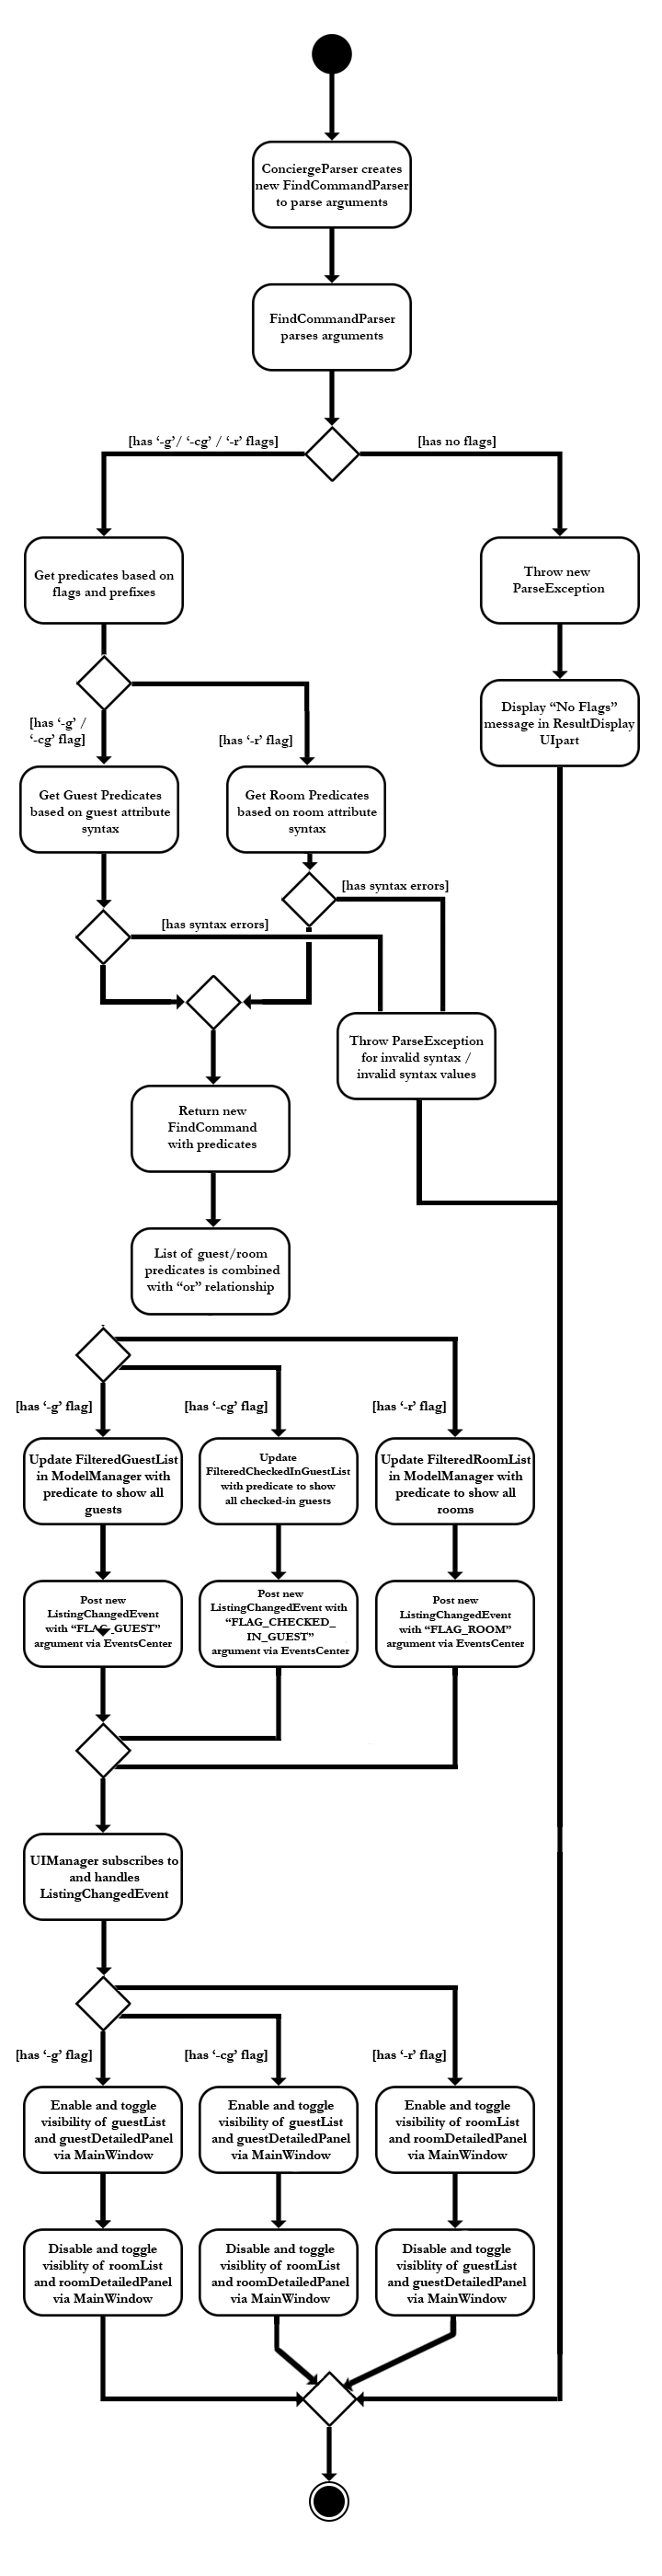
3.4.1. Current Implementation
The find function is facilitated by a modified FindCommand class, of which the input from the CommandBox is parsed by a FindCommandParser class.
The find function now has the ability to find either guests or rooms. The starting commands for the find function with flags are as follows:
-
find -g- Find guests. -
find -cg- Find checked-in guests. -
find -r- Find rooms.
The above command must be followed up by at least 1 filter, and they are as follows:
Guest Filters (-g):
-
n/ - Name -
p/ - Phone Number -
e/ - Email Address -
t/ - Tags
Room Filters (-r):
-
r/ - Room Number -
c/ - Capacity -
t/ - Room Tags -
n/ - Name of guest with bookings
The following are filters for room bookings. The flags cannot be mixed. The flags can be used independently, or with a from/to specified date. Input dates must be in DD/MM/YY format.
-
-hb - Has Bookings Flag -
-nb - No Bookings Flag -
from/ - Booking Start Date -
to/ - Booking End Date
The FindCommandParser uses a tokenizer to obtain the individual arguments/filters, whether the filter is present or not. If a filter is present, the input that precedes the filter prefix will be used to create the individual predicate class.
These predicate classes are collected into a list of predicates before they are combined and merged in the FindCommand class. The combined final predicate is then passed to the Model Manager to filter the guest/room list, and a listingChangedEvent is called to update the UI elements.
3.4.2. Design Considerations
Aspect: OR/AND Searching
When searching, a few things have to be considered. Does the filter specified have an OR relationship with one another, or an AND relationship. An example is this: find -g n/Alex t/VIP, this can be interpreted in two ways. Finding guests with name as "Alex" AND with tag "VIP", or name "Alex" or tag "VIP.
3.5. Room Check-in/Checkout feature
3.5.1. Current Implementation
The room check-in and checkout features makes use of UniqueRoomList.
The logic that supports the check-in and checkout operations mainly reside in the Concierge and Room classes.
-
UniqueRoomList#checkin(RoomNumber)— Checks in the first booking of the room identified by the given room number -
UniqueRoomList#checkout(RoomNumber)— Checks out the first booking of the room identified by the given room number -
UniqueRoomList#checkout(RoomNumber, LocalDate)— Checks out the room’s booking whose start date matches the given date
|
Active booking refers to a booking that includes today’s date. First booking refers to the earliest (i.e. first in chronological order). |
A room can be checked out regardless of its checked-in status. Thus, checkout doubles as a command to delete bookings.
|
These operations are exposed in the Model interface as Model#checkInRoom and Model#checkoutRoom respectively.
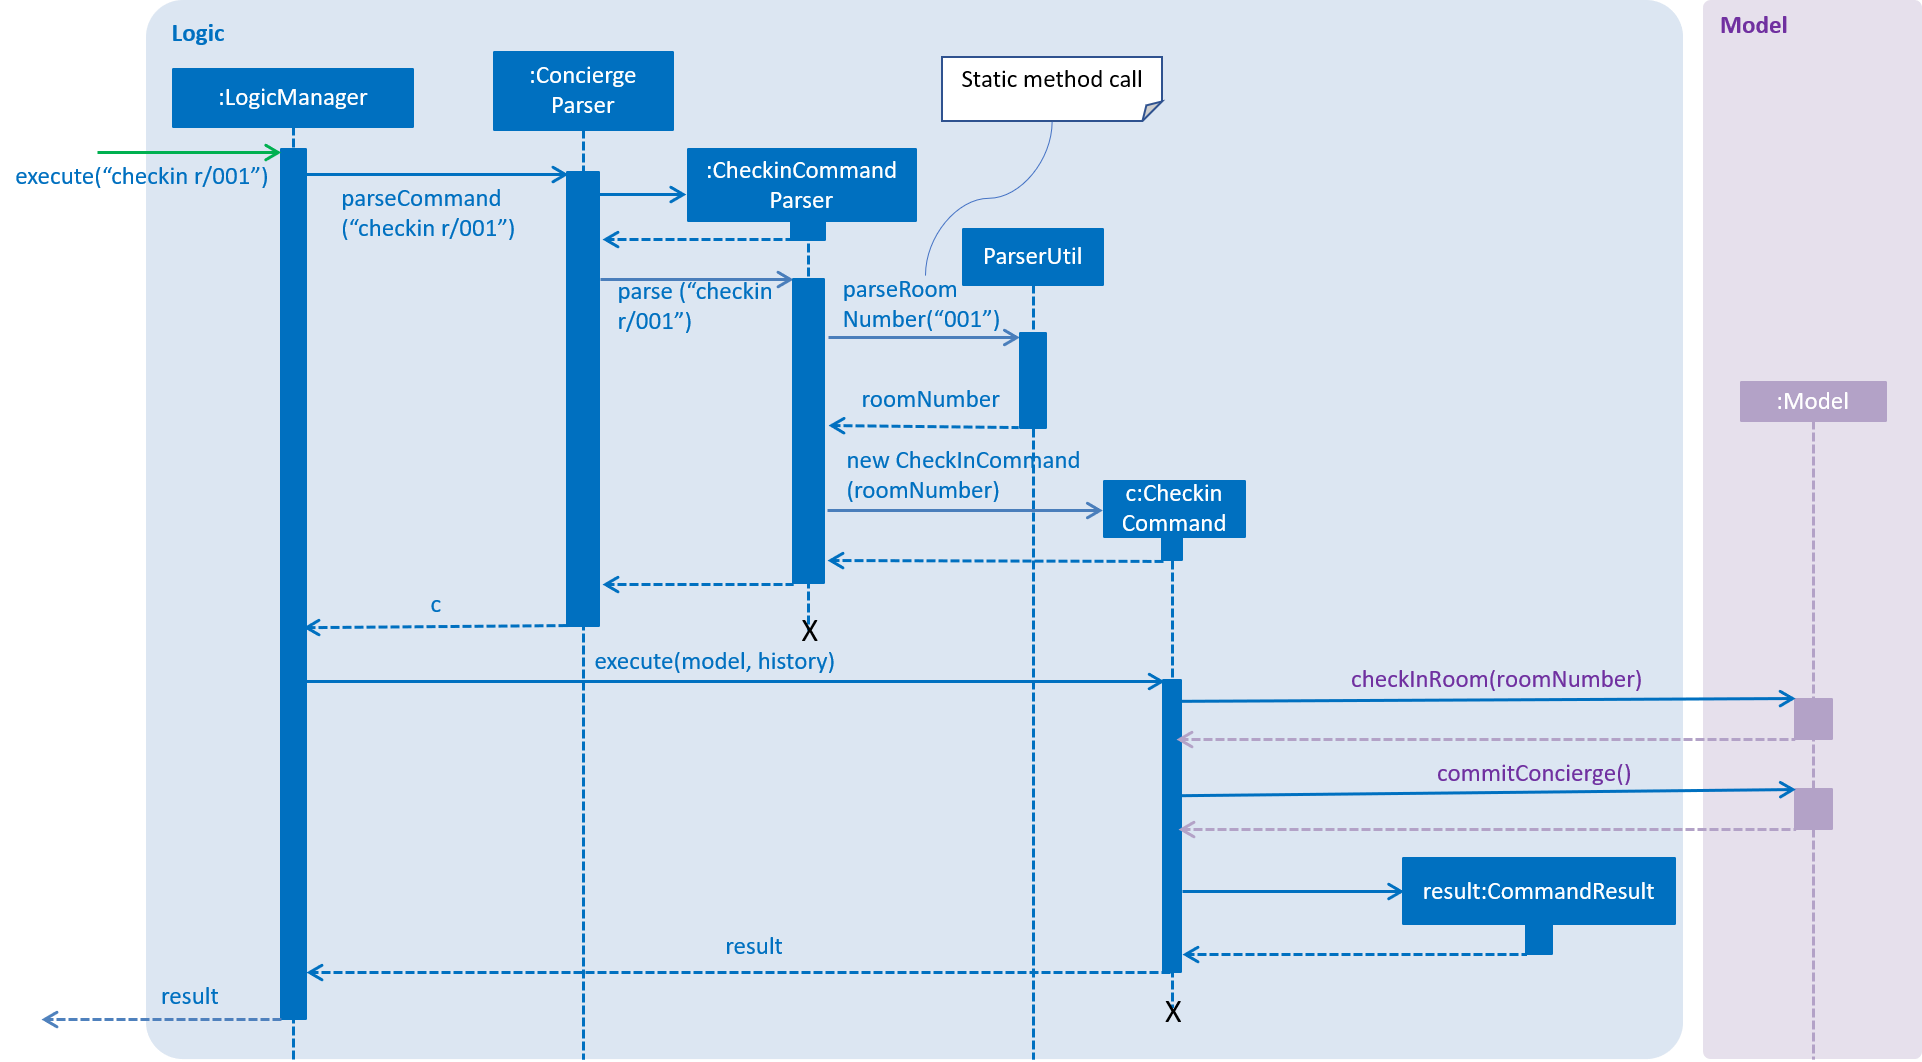
Given below is an example usage scenario and the flow of the check-in feature.
Assuming there is a booking already added to room 001,
-
The user executes
checkin r/001when the guest arrives.-
The
checkincommand takes in aRoomNumberargument and callsModel#checkInRoomas such:Model.checkInRoom(roomNumber) -
ModelManager#checkInRoom(which implements Model) will callVersionedConcierge#checkInRoom -
VersionedConcierge#checkInRoomwill callUniqueRoomList#getRoomto get the room using its RoomNumber -
VersionedConcierge#checkInRoomwill callRoom#checkIn -
Room#checkInwill-
throw
NoBookingExceptionif the room has no bookings -
throw
ExpiredBookingExceptionif the room’s first booking is expired -
throw
InactiveBookingCheckInExceptionif the room’s first booking is not active -
throw
BookingAlreadyCheckedInExceptionif the room’s first booking is already checked in -
update the first booking as checked-in if no exceptions were thrown, and replace the room with its updated version that has the first booking checked-in
-
-
VersionedConcierge#checkinRoomwill callVersionedConcierge#addCheckedInGuestIfNotPresent -
VersionedConcierge#addCheckedInGuestIfNotPresentwill add the guest of the checked-in booking to the checked-in guest list if he/she is not already in it
-
The following sequence diagram shows how CheckInCommand#execute works, from the Logic up to the Model:
CheckInCommand#execute.Since the Model simply calls VersionedConcierge#checkInRoom, the following activity diagram will illustrate how
Concierge#checkInRoom works:
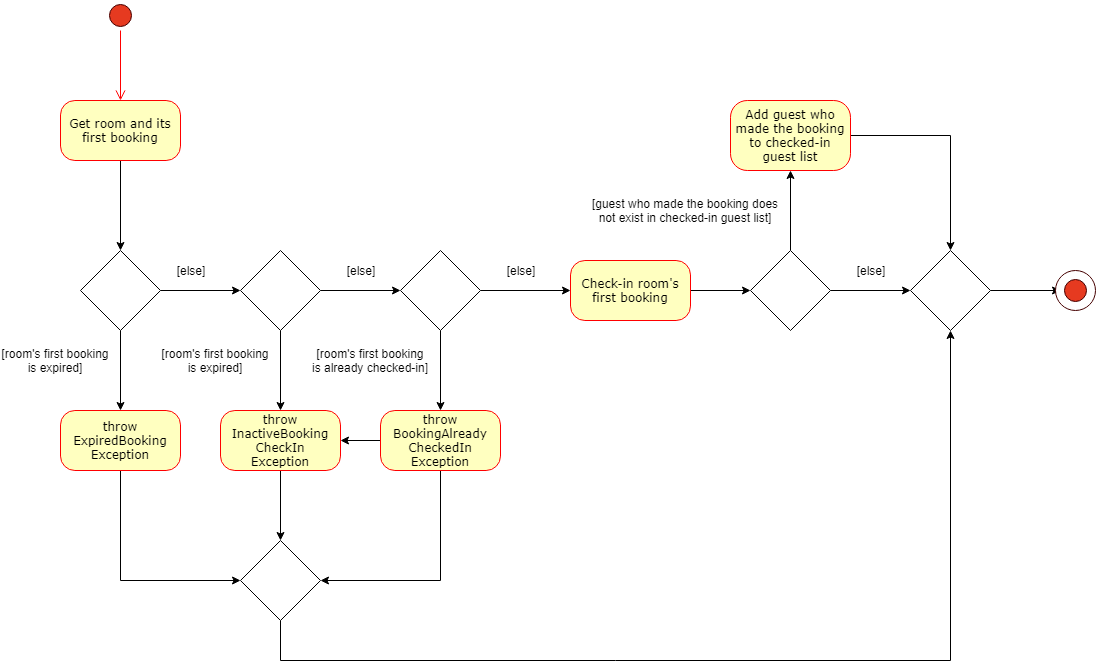
Concierge#checkInRoom is executed.3.5.2. Design Considerations
Aspect: Immutability of check-in command
-
Alternative 1 (current choice):
checkIna room by creating a new copy of the room with theisCheckedInflag of the first booking set to true.-
Pros: Debugging is easy. Consistent with the rest of the application.
-
Cons:
checkInmethod becomes unintuitive, since a new room is returned from the operation, instead of a void method simply setting the instance property.
-
-
Alternative 2:
checkIna room by setting theisCheckedInflag of the first booking to true.-
Pros: Check-in method is intuitive, and does not return a new room.
-
Cons: Harder to debug. Tests also become troublesome since changes are made to the same referenced room.
-
Aspect: Deletion of bookings
-
Alternative 1 (current choice): Use
checkoutto delete any booking.-
Pros:
checkoutdoubles as a delete booking feature, so no need for adeletebookingcommand. -
Cons: Not very natural, as
checkoutimplies checking out a checked-in booking.
-
-
Alternative 2: Use
checkoutto delete only active booking, and create new commanddeletebookingto delete expired and upcoming bookings.-
Pros: More natural,
checkoutcan only do what its name implies. -
Cons: Need to implement new command and more methods, to support the same deletion operation but with a different name.
-
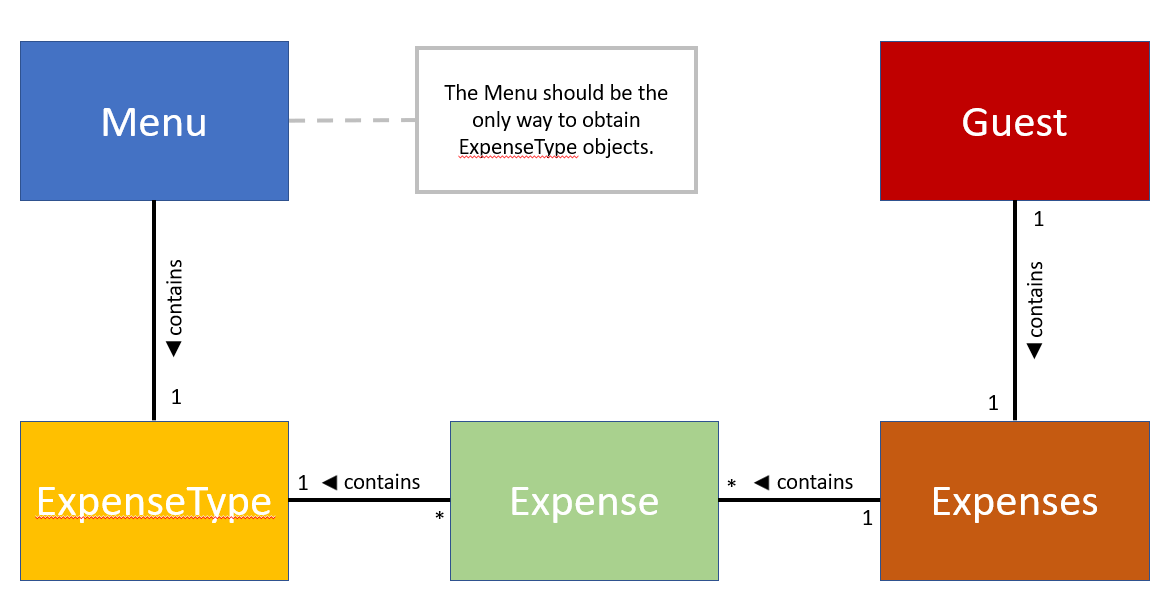
3.6. Expense, Expenses and ExpenseType
In Concierge, users will be given the feature of tracking the expenditure of each individual
guest, in order to facilitate checkout charges. Hence, the three classes, Expenses, Expense
and ExpenseType have been created for this purpose. In addition, the hotel also has a
Menu of goods and services available.
3.6.1. Current Implementation
ExpenseType objects are essentially immutable objects that represent a single item or service
being sold at the hotel. An ExpenseType object contains information about its menu number,
usual price, and description. The main purpose of this class is for convenience; users may
charge a customer by simply providing the menu number of the item and the cost and description
of the item will be able to be referenced. ExpenseType information is stored in a Menu
object, which is then stored on the hard disk, since users should have the ability to modify
the menu manually. The Menu object is internally represented with a HashMap<String, ExpenseType>,
with the menu number as keys and the ExpenseType objects as values.
-
Alternative 1: Use a List<ExpenseType> to store the menu. While there may be negligible differences for a small menu, searching for an
ExpenseTypeobject still takes linear time and there may be significant performance drops for a large menu.
An Expense object contains information about one individual expenditure by a guest. An
Expense object encapsulates the cost, ExpenseType of the item bought, and the date and time
of expenditure.
The Expenses object is essentially a List<Expense>. Every room contains an Expenses
object, to represent the collection of all the expenses of the guests in the room.
-
Alternative 1: Use a
List<Expense>object: Defining theExpensesclass allows us to restrict access to the collection, and only allow certain methods such as adding anExpenseor displaying on screen. -
Alternative 2: Use a
Set<Expense>object: Having the expenses ordered (e.g. chronologically) will be useful for generating a nice view of all the expenses incurred.
Here is a simple UML describing the roles of these classes.
3.6.2. Design Considerations
Aspect: Immutability of Menu
While it is conceivable that the items sold may change from time to time,
for various reasons such as unpopularity or seasonal products, giving users
the ability to add and remove items from the menu may result in more
problems than benefits. We expect that alterations to the menu will not be
performed frequently, and that the majority of our users, receptionists,
will not be required to add and remove items to the menu. The menu also does
not have to be altered during operational hours. Hence, by making
Menu immutable, we eliminate the possibility of making accidental or
unwarranted changes to the menu. The only method to modify Menu would
thus be through the XML file, which we believe is suitable for these
purposes.
Aspect: Immutability of ExpenseType
The ExpenseType object is meant to hold the default values of the name and
price of each item. In other words, since an Expense object references an
ExpenseType object, the Expense object is allowed to have a cost that
is different from the cost in the corresponding ExpenseType object, to
account for cases such as the guest having a personalised discount due to
the usage of vouchers or certain credit cards. Thus, ExpenseType does not
need to be modified by users in the application. Nonetheless, it is still
possible to modify the default information through editing the XML file.
Aspect: Assignment of the Expenses object
-
Alternative 1 (current choice): Assign
expensesto eachRoom.-
Pros: Suitable for current architecture. Each
Bookingonly has oneGuest, and eachGuestwill only stay in oneRoom. Makes more sense to assign toRoomsuch that it represents the expenditure of the entireRoomand not oneGuest, since the occupants of theRoomcan only contribute to one singleExpensesobject.Roomis a more natural choice overBookingasBookingis meant to encapsulate booking information such as timing andRoom. Not much difference in implementation no matter which one of the three classes it is assigned to. -
Cons: May be confusing to implement. Need to ensure that there are no expenses for rooms that have no guests.
-
-
Alternative 2: Assign
expensesto eachGuest.-
Pros: Can track
expensesof eachGuest, can find out who are the heavy spenders. Can use this information for promotional activities such as vouchers or membership. -
Cons: Not all guests that will stay in the hotel are registered in the guest list, since each
Bookingonly requires the name of oneGuest, regardless of theRoom. Will require a major refactoring of theaddcommand. Complications may also arise if aGuesthas multiple bookings simultaneously and there is a need to track theExpensesover different rooms.
-
-
Alternative 3: Assign
expensesto eachBooking.-
Pros: Can allow tracking of the booker’s expenditure, less confusing to implement than
Room, can allow for expenses to be recorded before the guest checks in. -
Cons: May violate SRP, since
Bookingshould ideally only deal with booking information.
-
3.7. Money
3.7.1. Current Implementation
Money is a class used to store monetary values. This class was created to
enforce the restriction that monetary values should always have at most two
decimal places, which could be inconvenient if using Java data types such
as double or BigDecimal. Money objects can be created by the user
through the service command (details in the next section).
The Money class contains two main attributes, dollars and cents, both
of which are int`s, since it is unlikely that the cost of any one item will
exceed `Integer.MAX_VALUE dollars.
The main method of creating Money objects is through the service command,
with the Money class parsing a string to convert into a Money object.
The method isValidMoneyFormat() handles the checking of the string format,
and the list of requirements are as follows:
-
Can be negative.
-
Format of the string should be {1 to 10 digits}.{2 digits}, e.g.
12.34.123,.50,12.9,12345612345.00are not allowed. -
The
dollarssection can be 0 but cannot have leading 0, i.e. 0.12 is allowed but 01.23 is not allowed. -
The
dollarssection should not exceedInteger.MAX_VALUE. -
Cannot have characters that are not digits or
.or-.
3.7.2. Design Considerations
Aspect: Immutability of Money
Money does not have to be mutable. Adjustment of Expenses are to be done
through the service command. Money is simply a data type, much like
Double and Integer.
3.8. ServiceCommand
3.8.1. Current Implementation
The service command is used for charging expenses to rooms. This
functionality is the main reason that the classes Expenses, Expense,
ExpenseType, Menu and Money were implemented. The format for the service
command is as such:
service r/ROOM_NUMBER no/ITEM_NUMBER [c/COST]
The cost is made optional for the convenience of the user. We expect that
most of the time, the cost of items are more or less fixed. Instead of
having the user type in the same cost all of the time, the field is made
optional. This functionality is enabled by the use of ExpenseType and
Menu, which stores the default cost of items. If the cost is not specified,
the default cost of the item will be used.
As in AddressBook4, the ConciergeParser (aka AddressBookParser) will parse
the user input and create a ServiceCommandParser object to parse a service
command. The ServiceCommandParser is responsible for checking that the
RoomNumber and cost (a Money object) are in the correct format. Note that
the item number is not checked here, since the Menu object of Concierge
has to be available in order to check that the given item number is a valid
item. Hence, any string will be accepted by the parser. Since ServiceCommand
has access to the Model and thus the Menu, the checking is given to
ServiceCommand instead. A successful parse will then return a
ServiceCommand(RoomNumber roomNumber, String itemNumber, Optional<Money> itemCost)
object.
The following flowchart describes what happens when the execute method
of a ServiceCommand is called.

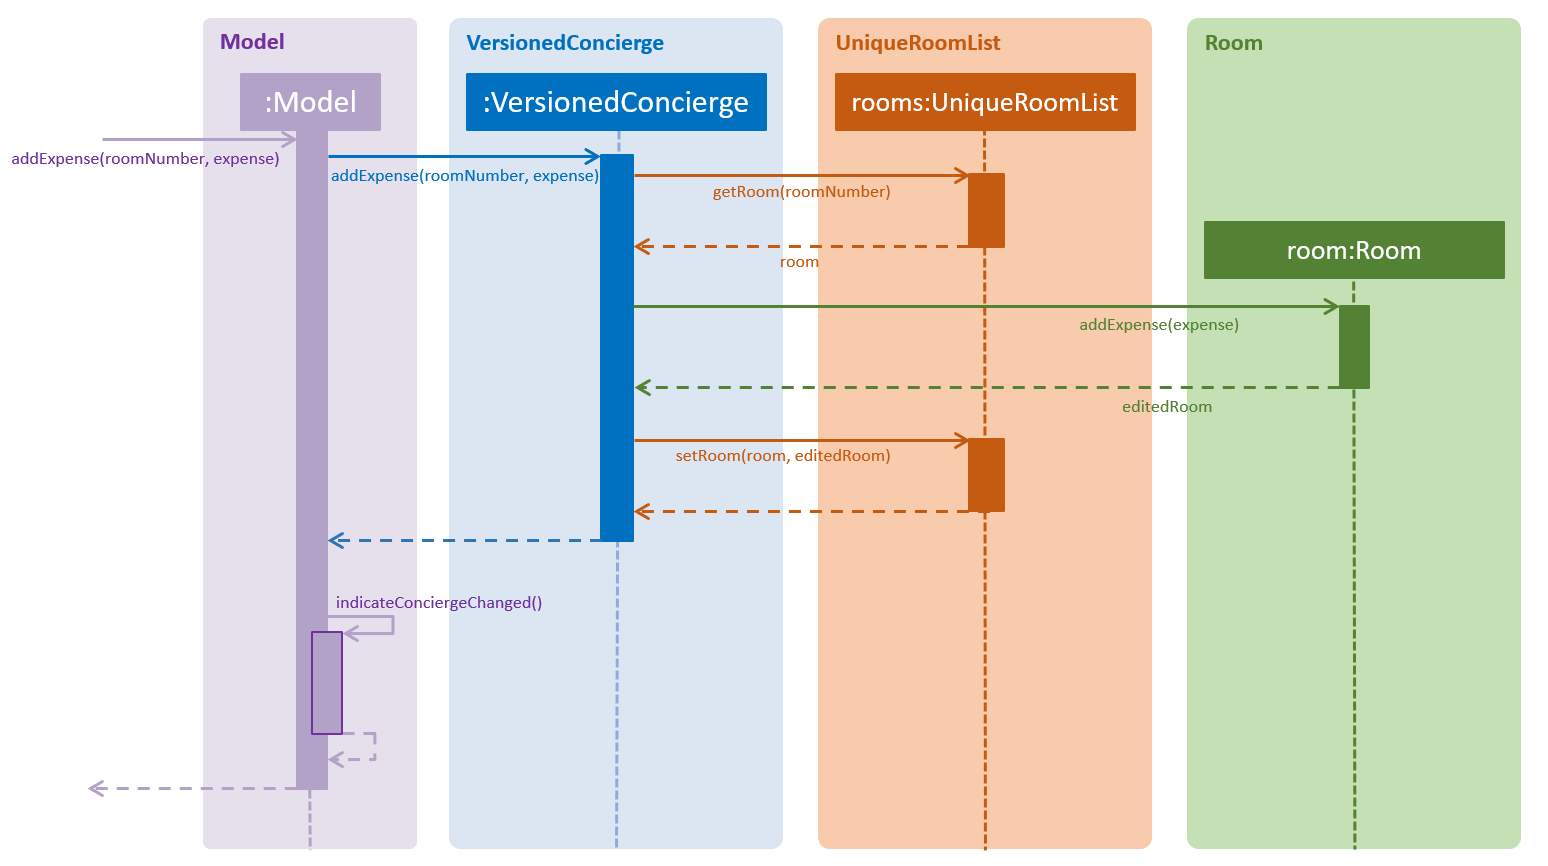
The model.addExpense() method call was not illustrated in detail in the flowchart,
thus it is illustrated in this sequence diagram.
3.8.2. Design Considerations
Aspect: Deleting and editing Expenses
-
Alternative 1 (current choice): Use
serviceto edit `Expense`s.-
Pros: Simply keying in `Expense`s with negative values is easy to implement, and does not stray far from real-life implementations, e.g. receipts often contain cost subtractions for discounts and promotions.
-
Cons: May not be elegant,
Expensesmay become cluttered if there’s too many corrections.
-
-
Alternative 2: Create new commands to edit and delete `Expense`s.
-
Pros: The
Expenseswill contain all the `Expense`s at their correct prices. -
Cons: More effort to implement, difficult to implement, e.g. may need to implement listing out all
Expense`s of a `Roomwith thelistcommand in order to select theExpenseto delete or edit. Information on discounts and corrections will also be lost.
-
3.9. Login and Logout
The login feature allows hotel managers to control which receptionists
have full access to Concierge. When paired with the CommandArchive feature,
they can also create a blame history to trace rogue commands.
3.9.1. Current Implementation
Currently, login is implemented as a
dynamic feature,
so users are not prompted to sign in upon starting Concierge. Instead, they
only have to sign in when executing commands which would mutate the data,
such as add, checkin, checkout, reassign, service and clear.
Logic
Given the nature of the login command being dynamic (can be entered at any
point in time, between any commands), it is then natural to implement it like
a normal command, extending the abstract Command class. The logout command
is also implemented in this way.
Model
The model handles the signing-in, using its attribute LogInManager.
The Class Diagram of the login module is shown below.

LogInManager uses an optional username to keep track of whether
the user is currently signed in. The passwordReferenceList provides an
immutable key-value lookup for usernames and passwords.
LogInManager implements the following operations.
-
LogInManager#isSignedIn()- checks if the user is currently signed in. -
LogInManager#signIn(String, String)- attempts to sign in with the given username and hashed password. This is handled by thePasswordHashList. A case-insensitive comparison is used on the hash. -
LogInManager#signOut()- signs out of Concierge.
A new method resetUndoRedoHistory was added to the
VersionedConcierge (used for the Undo/ Redo feature). This is used to clear
the command history upon a logout command, so users cannot undo important
commands or redo accidental bad commands after signing out.
Login
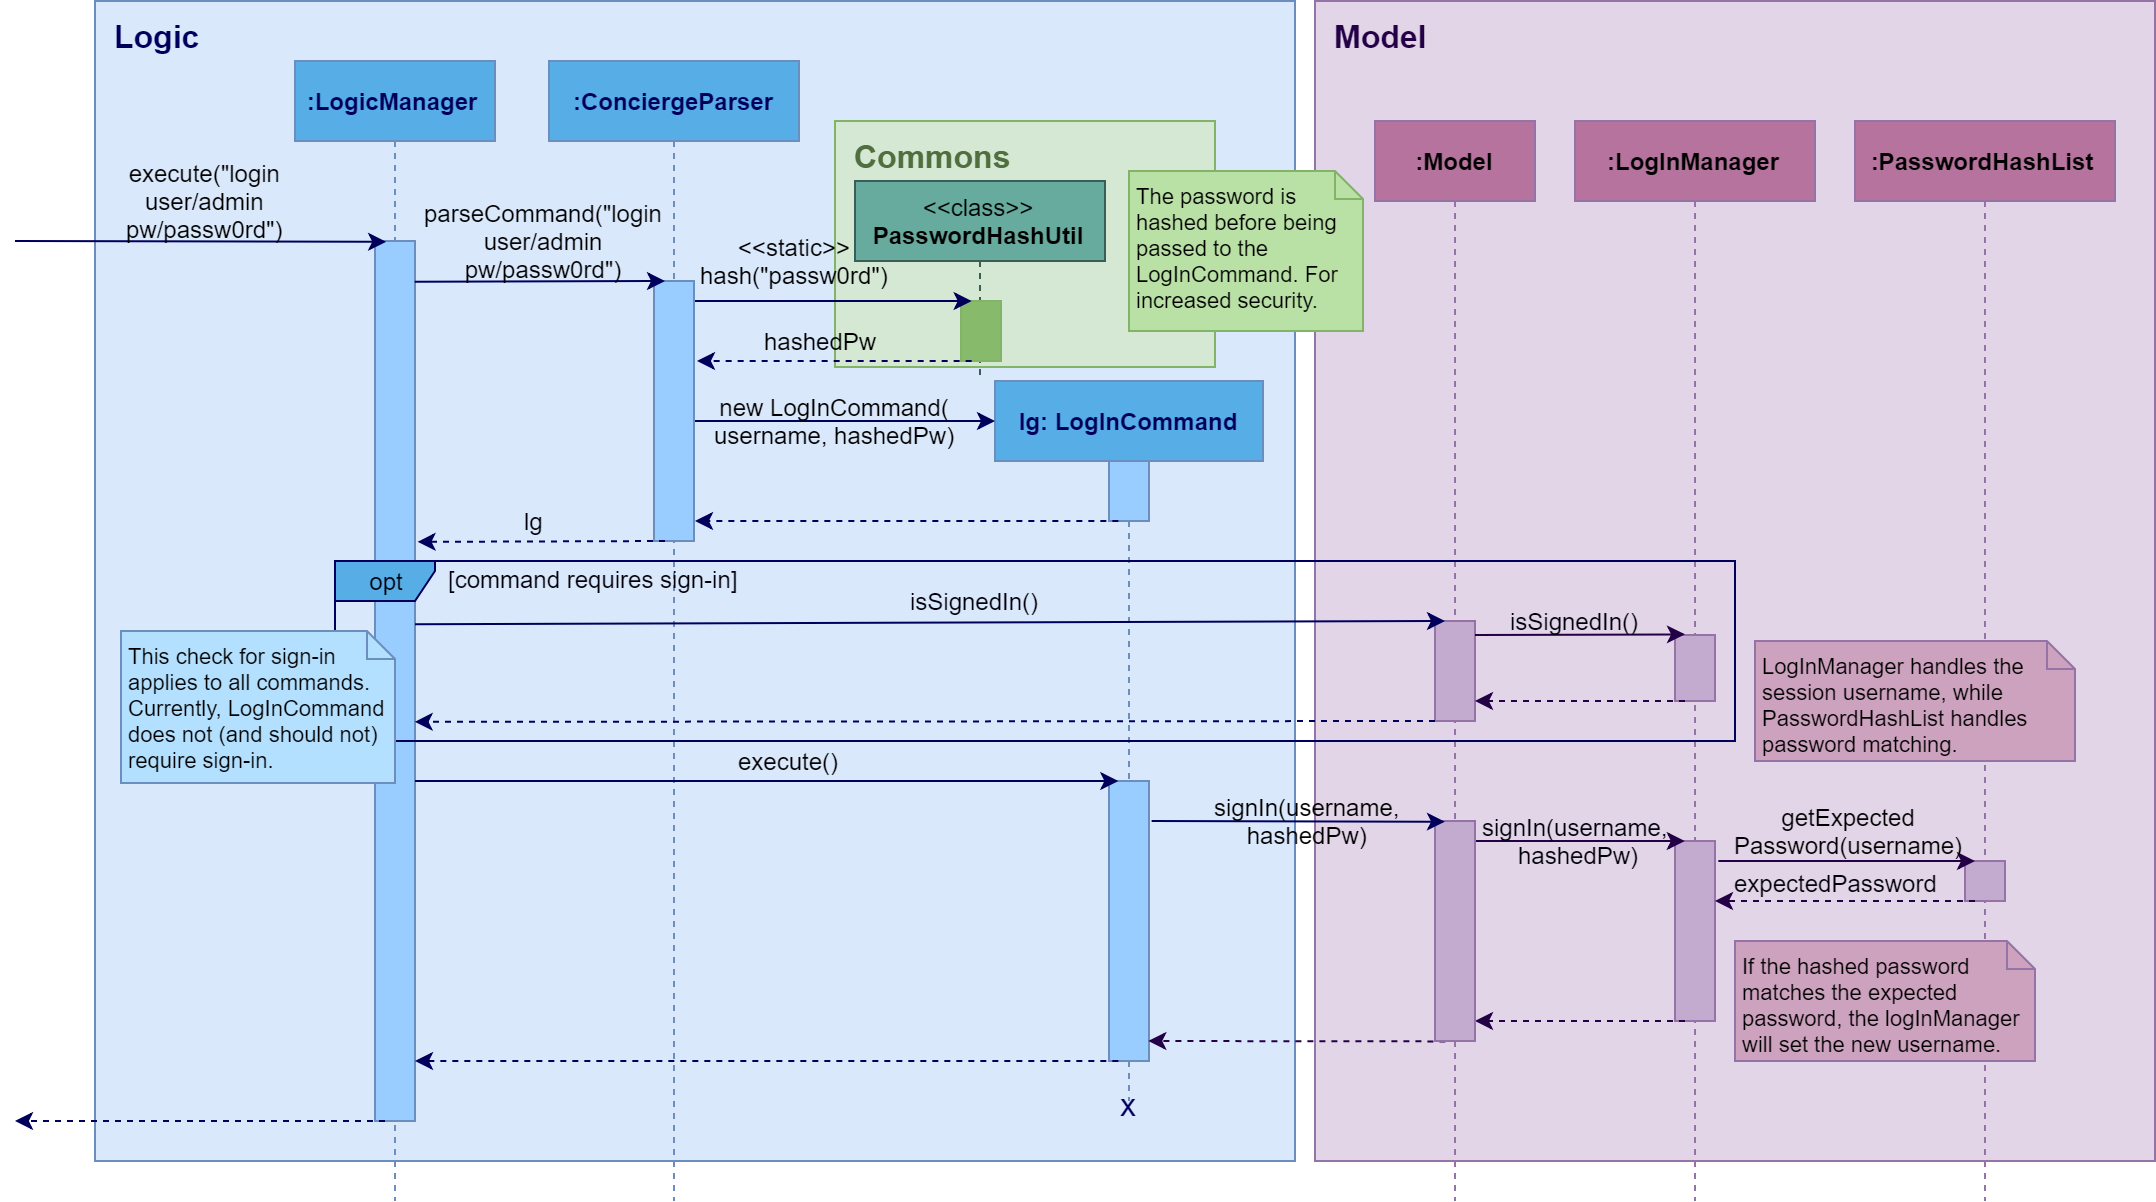
Shown below is the Sequence Diagram for executing a valid login command.
The diagram also illustrates how the LogicManager checks for the sign-in
requirement of commands.
Storage
The passwords.json file is read when Concierge is first opened (i.e. in
MainApp#init), and is never written to again. The storage function is
managed by the JsonPasswordsStorage class. Intuitively, passwords are stored as
key-value pairs for quick look-up.
A SHA-256 hash was used in building this feature. In future, this hashing algorithm can be changed to a HMAC hash, which adds a username salt. Then, different users will not know if they have chosen the same passwords.
Check for sign-in requirement of commands
LogicManager does the
checks for whether a command requires a sign in,
and whether the model is signed in.
The Command class exposes a new requiresSignIn() method that returns
false by default. To make new command require signing-in, one only has to
overwrite this method in that command.
3.9.2. Design Considerations
Aspect: Accessing features of Concierge with/ without login
-
Alternative 1 (current choice): Login is needed only for some features
-
Pros: Manager can implement some level of access control within Concierge, especially since some of the more commonly used Concierge features (
list,find) are read-only features. This is quicker than mandating a sign-in at the start and creating different user views based on the account privilege (admin vs normal). -
Cons: Not very intuitive to users. They have to enter commands before being told they need to sign in. The
requiresSignIn()check takes place after the parsing of the command, so a user can is told they cannot execute the command without a sign-in after their command is parsed correctly.
-
-
Alternative 2: Login is needed for all features
-
Pros: Very easy to check login validity. This only occurs when Concierge is first loaded. Subsequent commands can be executed without additional checks on the sign-in requirement.
-
Aspect: Check for sign-in requirement of commands
Given that sign-in is only required for some commands, the priority in designing this aspect is the ability to easily mandate/ disable compulsory the login requirement for current and future commands.
-
Alternative 1 (current choice): Do the check in
LogInManager#execute-
Pros: Ensures that commands are checked before any execution. Users will not inadvertently change the model before doing the sign-in checks.
-
Cons: Unable to implement commands that can do some actions without sign-in. For example, a future developer may want to make the
addcommand such that when the user is not signed-in, the booking is still added but a tag is added to theGuest, reminding the manager to verify the booking.-
Violates the Single Responsibility Principle. The job of
LogicManageris to parse and execute commands.
-
-
-
Alternative 2: Do the check in
Command#execute-
Pros: Increases cohesiveness of
Commandclass. The compulsory sign-in is an attribute of aCommand, so these checks can be done internally.Commandcan implement a methodcheckSignIn(Model), and commands which require sign-ins can call this method in their respectiveexecutemethods. -
Cons: While increasing cohesion, this implementation makes less semantic sense. The logical misstep comes because one is executing the method, then checking if the method can be executed, then "reversing" the execution.
-
Aspect: Storage of Passwords
The password file is currently read at MainApp#init, and saved once.
Unlike the Concierge data, this file is no longer referred to when Concierge
is in use.
-
Alternative 1 (current choice): Store passwords in JSON file
-
Pros: JSON is very easy to work with.
-
Able to utilise existing
JsonUtilmethods used by theUserPrefsandConfigclasses. -
Easily parse data into key-value pairs, which semantically matches our needs.
-
-
Cons:
JsonUtilfile is not completely suitable for a data type that has potentially an unlimited number of entries, since this utility serialises the data to match the class attributes.
-
-
Alternative 2: Store passwords in same XML file as all other Concierge data
-
Pros: Centralises data storage in Concierge. There is only one single source of truth for all data.
-
Cons: The XML file is too complicated for the needs of password storage.
-
Concierge does not need to write the the passwords file when in use.
concierge.xmlis constantly being written to, which is an unnecessary and possibly unsafe feature for the passwords component. -
Creating a new password entry is difficult since once has to add all the layers of XML tags involved. Nevertheless, users are not expected to be adding new accounts on a regular basis.
-
-
3.10. Autocomplete: Ctrl, Alt
3.10.1. Overview
The Autocomplete feature allows the user to seamlessly type in the full command and prefixes without having to worry if he/she missed out on any prefix. This feature helps the user by prompting the correct format. This is useful as some of the commands require several inputs from the user and hence this will save time and commands can be executed faster.
A quick-clear has also been added as part of this feature, so that
the user can again, save time.Press Alt to quick-clear the
CommandBox (saves time for user when he wants to clear the box).
The command box before Alt is pressed:

The command box aft Alt is pressed:

3.10.2. Example of how feature works
Step 1: Launch application
Step 2: User enters a in CommandBox then presses Ctrl.
AutoCompleteManager() compares input through the list of
initCommandKeyWords`and proceeds to display the command in the
`CommandBox
because a is an applicable COMMAND_WORD.

After Ctrl has been pressed, it automatically inserts the
first prefix PREFIX_NAME in the command line.

Step 3: After the user fills up the PREFIX_NAME field, he can press
Space to move on to the next prefix. After pressing Space, then
he can press Ctrl. At this point, AutoCompleteManager() is
called again but this time instead of calling the getAutoCompleteCommands()
it calls getAutoCompleteNextMissingParameter since it will detect
the presence of the PREFIX_NAME parameter.
This is the expected outcome before pressing Ctrl

This is the expected outcome after pressing Ctrl

Step 4: The user repeats Step 3 until all parameters are input by the user
and then presses Enter to execute the command.
Note: For AddCommand, the final parameter PREFIX_TAG is optional, so
the user can just delete it if he chooses not to add a tag.
This is the expected outcome after all the parameters are filled.

Press Enter to execute the command.
Given below is the activity diagram for the Autocomplete feature.
Activity Diagram :
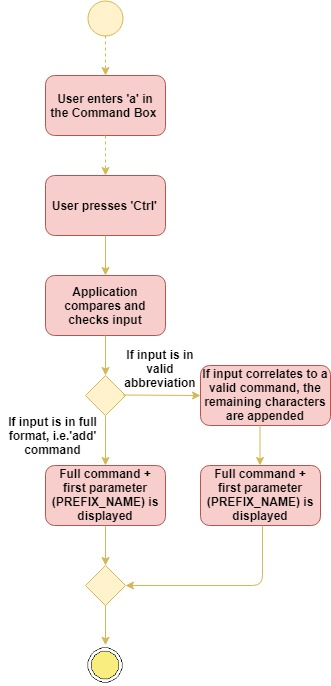
Activity Diagram demonstrates what happens when user presses Ctrl
3.10.3. Current Implementation
The Autocomplete mechanism is facilitated by AutoCompleteManager, which
can be found in LogicManager. It supports the auto completion of incomplete
commands by providing a list of auto completed commands from a given incomplete
command.
An underlying Trie data structure is used to facilitate the AutocompleteManager.
Trie only supports autocompletion of commands that are provided by the
AutocompleteManager. The CommandParameterSyntaxHandler that is found in
AutocompleteManager supports the autocompletion of parameters for commands.
Given below is the class diagram for the Autocomplete feature.
Autocomplete Class Diagram :
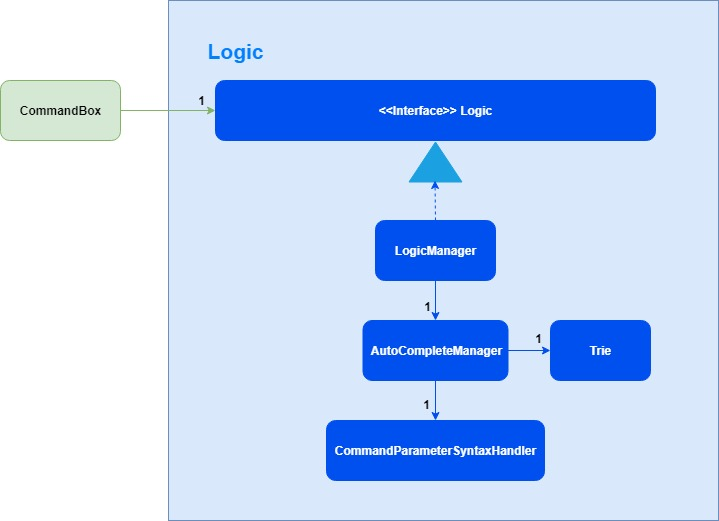
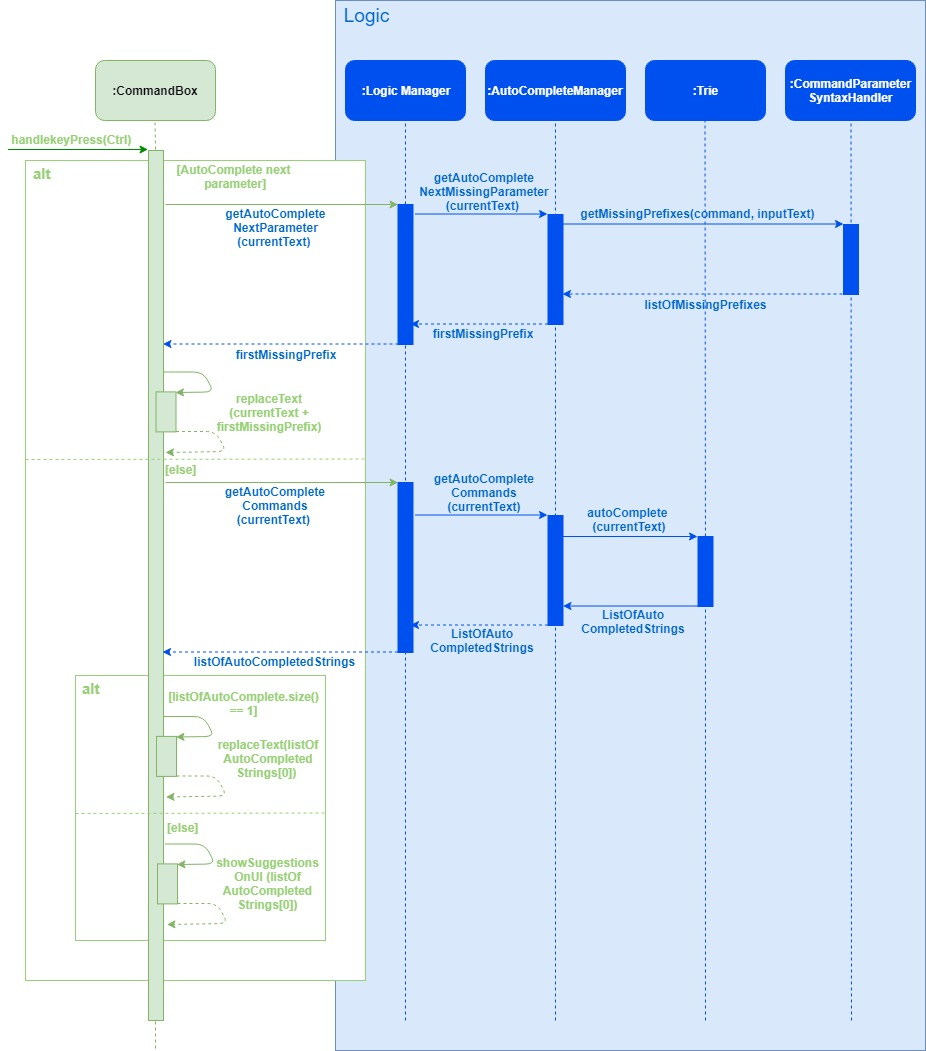
The CommandBox interacts with the AutocompleteManager using LogicManager.
When the user presses Ctrl in the command box, the CommandBox will
handle the Ctrl key press event and will execute the AutoCompleteUserInput()
method.
Given below is the sequence diagram for the Autocomplete feature.
Autocomplete Sequence Diagram :
3.10.4. Design Considerations
Aspect: Implementation of Autocomplete
-
Alternative 1 (current choice): Use a manager (
AutoCompleteManager) to handle the autocomplete helper methods.-
Pros: Allows for better usability and more code abstraction.
-
Cons: The amount of time taken for a new developer to to understand all the interaction between methods will be longer.
-
-
Alternative 2: Iterate through all possible commands to find match prefix.
-
Pros: Implementation of this alternative would be easier.
-
Cons: If there are too many commands being input consecutively, the application might start to lag due to possible loss of performance.
-
Aspect: Implementation of Algorithm
-
Alternative 1 (current choice): Trie Data Structure
-
Pros: Performance of application will be better.
-
Cons: The complexity of implementation is higher.
-
-
Alternative 2: Iterate through all possible commands to find match prefix.
-
Pros: Implementation of this alternative would be easier.
-
Cons: If there are too many commands being input consecutively, the application might start to lag due to possible loss of performance.
-
3.11. [Proposed] Command Archive feature
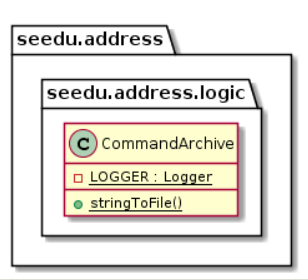
Given below is the UML diagram for the CommandArchive Class:
Given below is the UML diagram for the CommandHistory Class:
3.11.1. Current Implementation
The Command Archive mechanism is facilitated by CommandArchive.
It utilises the userInputHistory to extract the latest command that the user
has input and passes the inputString`to `stringToFile method in CommandArchive
class. The inputString is then appended to the CommandFile.txt file.
Additionally, it implements the following operations:
-
StringBuilder()— The main operations of theStringBuilderare theappendandinsertmethods which can be overloaded to accept data of any type. Theappendmethod always adds these characters at the end of the builder.This operation can be found inCommandHistory. -
toString()— Converts the StringBuilder object into a string namedinputStringso it can be passed to theCommandArchiveclass. This operation can be found inCommandHistory.*getLogger()— CreatesLOGGERso that it can log anyIOExceptionsthat are caught in the catch blocks of the methods found instringToFilemethod ofCommandArchive. -
substring()— Extracts the latest command from theuserInputHistory. This is required because theuserInputHistoryappends all the older commands into the LinkedList as well. This is done by looking for the first newLine character occurrence of theinputString. The substring is then extracted aslatestUserCommand. This operation can be found inCommandArchive. -
simpleDateFormat()— Creates atimeStampin DD/MM/YYY format that can later be appended tolatestUserCommand. This operation can be found inCommandArchive. -
fileWriter— Writes the stream of characters (which islatestUserCommand) tocommandHistoryfile. This will eventually be the output that is written intocommandFile.txtviaPrintWriter. ThePrintWriteralso appendstimeStampto the latest entry (which is eventuallytimeStamp+latestUserCommand). This operation can be found in CommandArchive`.This command requires a login.
3.11.2. Design Considerations
Aspect: How to extract userInputHistory
-
Alternative 1 (current choice):
userInputHistoryis first put into astringBuilderand then converted to string to then pass toCommandArchive.-
Pros:
-
Easy to implement because
StringBuildercan utiliseappendandinsertmethods, which can be overloaded to accept any data. -
Faster than
StringBufferunder most implementations. -
StringBuilder is mutable while String is immutable.
-
-
Cons: String is more optimised especially if you don’t need the extra features of
StringBuilder
-
-
Alternative 2: Create a KeyLogger class that implements KeyListener to capture userInput.
-
Pros: It is more secure and can only be accessed for audits and other administrative access purposes and is hidden from the user.
-
Cons:
-
If implemented wrongly, it will become a global KeyLogger that captures userInput outside of application.
-
Does not utilise the existing infrastructure and data found in the base level program class
CommandHistoryand hence would require more effort to implement.
-
-
3.12. [Proposed] Data Encryption
{Explain here how the data encryption feature will be implemented}
3.13. Logging
We are using java.util.logging package for logging. The LogsCenter class is used to manage the logging levels and logging destinations.
-
The logging level can be controlled using the
logLevelsetting in the configuration file (See Section 3.14, “Configuration”) -
The
Loggerfor a class can be obtained usingLogsCenter.getLogger(Class)which will log messages according to the specified logging level -
Currently log messages are output through:
Consoleand to a.logfile.
Logging Levels
-
SEVERE: Critical problem detected which may possibly cause the termination of the application -
WARNING: Can continue, but with caution -
INFO: Information showing the noteworthy actions by the App -
FINE: Details that is not usually noteworthy but may be useful in debugging e.g. print the actual list instead of just its size
3.14. Configuration
Certain properties of the application can be controlled (e.g App name, logging level) through the configuration file (default: config.json).
4. Documentation
We use asciidoc for writing documentation.
| We chose asciidoc over Markdown because asciidoc, although a bit more complex than Markdown, provides more flexibility in formatting. |
4.1. Editing Documentation
See UsingGradle.adoc to learn how to render .adoc files locally to preview the end result of your edits.
Alternatively, you can download the AsciiDoc plugin for IntelliJ, which allows you to preview the changes you have made to your .adoc files in real-time.
4.2. Publishing Documentation
See UsingTravis.adoc to learn how to deploy GitHub Pages using Travis.
4.3. Converting Documentation to PDF format
We use Google Chrome for converting documentation to PDF format, as Chrome’s PDF engine preserves hyperlinks used in webpages.
Here are the steps to convert the project documentation files to PDF format.
-
Follow the instructions in UsingGradle.adoc to convert the AsciiDoc files in the
docs/directory to HTML format. -
Go to your generated HTML files in the
build/docsfolder, right click on them and selectOpen with→Google Chrome. -
Within Chrome, click on the
Printoption in Chrome’s menu. -
Set the destination to
Save as PDF, then clickSaveto save a copy of the file in PDF format. For best results, use the settings indicated in the screenshot below.
4.4. Site-wide Documentation Settings
The build.gradle file specifies some project-specific asciidoc attributes which affects how all documentation files within this project are rendered.
Attributes left unset in the build.gradle file will use their default value, if any.
|
| Attribute name | Description | Default value |
|---|---|---|
|
The name of the website. If set, the name will be displayed near the top of the page. |
not set |
|
URL to the site’s repository on GitHub. Setting this will add a "View on GitHub" link in the navigation bar. |
not set |
|
Define this attribute if the project is an official SE-EDU project. This will render the SE-EDU navigation bar at the top of the page, and add some SE-EDU-specific navigation items. |
not set |
4.5. Per-file Documentation Settings
Each .adoc file may also specify some file-specific asciidoc attributes which affects how the file is rendered.
Asciidoctor’s built-in attributes may be specified and used as well.
Attributes left unset in .adoc files will use their default value, if any.
|
| Attribute name | Description | Default value |
|---|---|---|
|
Site section that the document belongs to.
This will cause the associated item in the navigation bar to be highlighted.
One of: * Official SE-EDU projects only |
not set |
|
Set this attribute to remove the site navigation bar. |
not set |
4.6. Site Template
The files in docs/stylesheets are the CSS stylesheets of the site.
You can modify them to change some properties of the site’s design.
The files in docs/templates controls the rendering of .adoc files into HTML5.
These template files are written in a mixture of Ruby and Slim.
|
Modifying the template files in |
5. Testing
5.1. Running Tests
There are three ways to run tests.
| The most reliable way to run tests is the 3rd one. The first two methods might fail some GUI tests due to platform/resolution-specific idiosyncrasies. |
Method 1: Using IntelliJ JUnit test runner
-
To run all tests, right-click on the
src/test/javafolder and chooseRun 'All Tests' -
To run a subset of tests, you can right-click on a test package, test class, or a test and choose
Run 'ABC'
Method 2: Using Gradle
-
Open a console and run the command
gradlew clean allTests(Mac/Linux:./gradlew clean allTests)
| See UsingGradle.adoc for more info on how to run tests using Gradle. |
Method 3: Using Gradle (headless)
Thanks to the TestFX library we use, our GUI tests can be run in the headless mode. In the headless mode, GUI tests do not show up on the screen. That means the developer can do other things on the Computer while the tests are running.
To run tests in headless mode, open a console and run the command gradlew clean headless allTests (Mac/Linux: ./gradlew clean headless allTests)
5.2. Types of tests
We have two types of tests:
-
GUI Tests - These are tests involving the GUI. They include,
-
System Tests that test the entire App by simulating user actions on the GUI. These are in the
systemtestspackage. -
Unit tests that test the individual components. These are in
seedu.address.uipackage.
-
-
Non-GUI Tests - These are tests not involving the GUI. They include,
-
Unit tests targeting the lowest level methods/classes.
e.g.seedu.address.commons.StringUtilTest -
Integration tests that are checking the integration of multiple code units (those code units are assumed to be working).
e.g.seedu.address.storage.StorageManagerTest -
Hybrids of unit and integration tests. These test are checking multiple code units as well as how the are connected together.
e.g.seedu.address.logic.LogicManagerTest
-
5.3. Troubleshooting Testing
Problem: HelpWindowTest fails with a NullPointerException.
-
Reason: One of its dependencies,
HelpWindow.htmlinsrc/main/resources/docsis missing. -
Solution: Execute Gradle task
processResources.
6. Dev Ops
6.1. Build Automation
See UsingGradle.adoc to learn how to use Gradle for build automation.
6.2. Continuous Integration
We use Travis CI and AppVeyor to perform Continuous Integration on our projects. See UsingTravis.adoc and UsingAppVeyor.adoc for more details.
6.3. Coverage Reporting
We use Coveralls to track the code coverage of our projects. See UsingCoveralls.adoc for more details.
6.4. Documentation Previews
When a pull request has changes to asciidoc files, you can use Netlify to see a preview of how the HTML version of those asciidoc files will look like when the pull request is merged. See UsingNetlify.adoc for more details.
6.5. Making a Release
Here are the steps to create a new release.
-
Update the version number in
MainApp.java. -
Generate a JAR file using Gradle.
-
Tag the repo with the version number. e.g.
v0.1 -
Create a new release using GitHub and upload the JAR file you created.
6.6. Managing Dependencies
A project often depends on third-party libraries. For example, Concierge depends on the Jackson library for XML parsing. Managing these dependencies can be automated using Gradle. For example, Gradle can download the dependencies automatically, which is better than these alternatives.
a. Include those libraries in the repo (this bloats the repo size)
b. Require developers to download those libraries manually (this creates extra work for developers)
Appendix A: Product Scope
Target user profile:
-
has a need to manage a significant number of contacts
-
prefer desktop apps over other types
-
can type fast
-
prefers typing over mouse input
-
is reasonably comfortable using CLI apps
Value proposition: manage contacts faster than a typical mouse/GUI driven app
Appendix B: User Stories
Priorities: High (must have) - * * *, Medium (nice to have) - * *, Low (unlikely to have) - *
| Priority | As a … | I want to … | So that I can… |
|---|---|---|---|
|
receptionist |
retrieve the room number of a guest |
provide any kind of services to the guest in his/her room |
|
receptionist |
view the prices of different room types |
inform the guests of the prices of different rooms |
|
receptionist |
mark rooms in need of maintenance or cleaning |
prevent guests from staying in those rooms |
|
hotel manager |
know which rooms' guests are checking out on a certain day |
assign cleaning staff to those rooms |
|
receptionist |
look at the available rooms of a certain type in a certain time |
designate rooms for guests |
|
receptionist / hotel manager |
know the room services called by a guest |
charge the guest accordingly |
|
receptionist |
keep track of the particulars of guests such as home address, phone number, room number |
contact them in the event of emergencies before, during or after their stay |
|
receptionist |
be informed of the guests that checked out late |
charge them with a late check-out fee |
|
receptionist |
swap rooms for guests |
allow guests to change rooms if they report any damages |
|
receptionist |
manually reduce / extend the stay of a guest (including late check-out requests) |
allow guests to change their check-out timing |
|
receptionist |
modify a guest’s particulars |
correct errors without rewriting the entry |
|
receptionist / hotel manager |
remove a guest’s entry |
facilitate the check-out procedure |
|
receptionist |
reserve rooms for guests |
allow guests to place bookings |
|
receptionist |
cancel bookings on request |
let other guests occupy the room |
|
hotel manager |
export the guests' profiles |
keep an archive |
|
hotel manager |
look at all financial transactions made between guests and the hotel |
facilitate the monthly audit |
|
receptionist / hotel manager |
red flag problematic guests and write descriptions on them |
warn the staff of problematic guests |
|
receptionist |
filter rooms by type, occupancy status, number of guests, etc. |
understand the current state of occupancy |
|
hotel manager |
know the usage statistics of facilities |
plan for budget and staff allocation |
|
hotel manager |
adjust the room rates |
take advantage of seasonal pricing |
|
hotel manager |
send my guests a "Thank You" note upon check-out |
maintain good relations with them |
|
hotel manager |
backup my data |
prepare for data corruption accidents |
|
receptionists |
convert room rates to common global currencies |
help guests better understand the pricing |
|
hotel manager |
know the average amount spent by guests who checked out in the current month |
evaluate the effectiveness of short-term events |
|
hotel manager |
look at which receptionist last edited a reservation or stay |
hold the receptionists accountable if mistakes were made |
Appendix C: Use Cases
UC1.1: Check-in a Guest
System: Concierge, Actor: Receptionist
MSS
-
Receptionist checks the room rates for all room types
-
Receptionist checks available rooms (not occupied or reserved) of the type guest wants
-
Receptionist ensures that room has all necessary maintenance completed
-
Receptionist assigns room to Guest
Use case ends.
Extensions
-
2a. System indicates that there are no rooms available
Use case ends.
-
4a. There are multiple Guests to be checked-in
-
4a1. Receptionist adds all Guests to System
Use case resumes at step 4.
-
UC1.2: Retrieve room number of a Guest
System: Concierge, Actor: Receptionist
MSS
-
Receptionist searches room number using Guest’s particulars (e.g. Name, ID, Phone Number, etc.)
-
System returns room number
Use case ends.
Extensions
-
2a. System indicates that the Guest is not staying in the hotel.
Use case ends.
UC1.3: Send room service to a Guest
System: Concierge, Actor: Receptionist
MSS
-
Receptionist retrieves room number of Guest (UC1.2)
-
Receptionist specifies what type of room service to send to Guest
-
System confirms room service sent to guest, with an ETA
Use case ends.
Extensions
-
3a. System indicates that there are no available hotel attendants at the moment
-
3a1. Receptionist puts Guest on a waiting queue
Use case ends.
-
UC1.4: Swap Guest’s room
System: Concierge, Actor: Receptionist
MSS
-
Receptionist views listing of available rooms (UC1.2)
-
Receptionist swaps guest’s room
-
System prompts to mark the vacated room for housekeeping
-
Receptionist sends for housekeeping service in vacated room
Use case ends.
UC1.5: Edit Guest’s personal particulars
System: Concierge, Actor: Receptionist
MSS
-
Receptionist identifies Guest using personal particulars (e.g. name, ID, phone number)
-
Receptionist updates Guest details
Use case ends.
UC1.6: Reserve a room for Guest
System: Concierge, Actor: Receptionist
MSS
-
Receptionist views listing of available rooms (UC1.2)
-
Receptionist specifies reservation dates
Use case ends.
UC2.1: Edit room rates
System: Concierge, Actor: Hotel Manager
MSS
-
Hotel Manager checks the room rates for all room types
-
Hotel Manager specifies new room rate for a particular room type
Use case ends.
Extensions
-
2a. Hotel Manager specifies an invalid room rate (has to be non-negative integer)
-
2a1. System displays an error message that no changes have been made
Use case ends.
-
UC2.2: Check statistics
System: Concierge, Actor: Hotel Manager
MSS
-
Hotel Manager specifies periodicity of earnings to checked-in
Use case ends.
{More to be added}
Appendix D: Non Functional Requirements
-
Should work on any mainstream OS as long as it has Java
9or higher installed. -
Should be able to hold up to 1000 guests without a noticeable sluggishness in performance for typical usage.
-
Command Line Interface is the primary mode of input. There is a preference for typing over mouse actions or key combinations. One-shot commands are preferred over multi-step commands.
-
A user with above average typing speed for regular English text (i.e. not code, not system admin commands) should be able to accomplish most of the tasks faster using commands than using the mouse.
-
Incremental development: a reasonably consistent delivery rate is expected.
-
The data should be stored locally and should be in a human editable text file, so that advanced users can manipulate the data by editing the file.
-
The software should follow the Object-oriented paradigm.
-
The project will not use a DBMS.
-
The software should be platform-independent.
-
The software should work without requiring an installer.
{More to be added}
Appendix E: Glossary
- Receptionist
-
Staff at the counter, in-charge of check-in and check-out procedures. They occasionally receive calls from potential guests
- Hotel Manager
-
The one guest in-charge of the entire hotel. Manages staff, guests and facilities
- Housekeeping
-
Staff in-charge of cleaning rooms and restoring them to the default configuration for a new Guest to stay
- Facilities
-
Facilities: Any form of services provided within the hotel. These include the spa, gym, game room, casino, laundry, bar, restaurants, etc
Appendix F: Product Survey
Cloudbeds
-
Easy to use: staff are able to learn how to operate the system with minimal training
-
Access to leading travel channels (e.g. booking.com)
-
Custom payment options
-
Group analytics
-
Global currency support
eZee Frontdesk
-
Booking Engine, Channel Manager and Restaurant POS in one system
-
Rate management to maximise revenue through seasonal stay rates
Frontdesk Anywhere
-
Export guest profiles
-
Data encryption and privilege control for users
-
Sends "Thank You" letters to guests after their stay
Hotelogix
-
Multi-device booking engine
MSI CloudPM
-
Automatic back-up on the cloud
-
Access to archived night audit reports
roomMaster
-
Complete audit trail for all financial transactions
-
Guest history available
Appendix G: Market Survey
Hotel Rendezvous
-
Interviewed via phone about hotel operations
-
For instance, using Hotel Rendezvous as reference, we discovered that hotels only require 1 guest of a booking to provide identifications details, thus the responsibility of the guest(s) under that booking falls to him/her.
Appendix H: Instructions for Manual Testing
Given below are instructions to test the app manually.
H.1. Autocomplete
Enter a in the command box and press Ctrl
Add command word is autocompleted with n/ prefix.
Fill in a name, press Space and Ctrl
You will be prompted with the next parameter.
Optional parameters (e.g. [t/TAG] in add) are at the back, and are up to you
to include.
Press Alt to clear your command box.
Enter c in the command box and press Ctrl
No autocompletion is in place because there is no unique command that starts
with c. checkin and checkout are both possible options.
H.2. Adding a Booking
add n/Pikachu p/81726354 e/pi@ka.chu t/wheelchair r/047 from/20/11/2018 to/23/11/2018
Unable to execute command because you have not signed-in to Concierge.
login user/admin pw/passw0rd
Successfully signed-in to Concierge. The previous booking can be successfully
made.
add n/Pikachu p/81726354 e/pi@ka.chu r/049 from/20/11/2018 to/23/11/2018
Pikachu can make a new (inactive)** booking in the same time period but a
different room.
add n/Pikachu p/81726354 e/pi@ka.chu r/049 from/16/11/2018 to/20/11/2018
Pikachu can make a new (active)** booking.
add n/Pikachu p/81726354 e/pi@ka.chu r/049 from/19/11/2018 to/21/11/2018
Unable to make booking because it overlaps with the previous booking.
add n/Pikachu p/81726354 e/pi@ka.chu r/047 from/14/11/2018 to/17/11/2018
Unable to make booking because it is outdated.
-
As of CS2103 Practical Exam which is expected to be on 16 November 2018.
H.3. Check-in
First, ensure that you have signed in by doing login user/admin pw/passw0rd.
-
Checking in a room that has an active first booking (i.e. booking period includes today’s date)
-
Prerequisites: There is a booking in the room you want to check in. Add an active booking to an empty room by doing:
add n/Pikachu p/81726354 e/pika@chu r/010 from/16/11/2018 to/20/11/2018 -
Test case:
checkin r/010
Expected: Checks-in the guest Pikachu’s booking and adds him to the checked-in guest list.
-
-
Checking in a room that has an expired first booking (i.e. ends before today’s date)
-
Prerequisites: There is a booking in the room you want to check in. Room 006 has a preloaded expired booking for you to test.
-
Test case:
checkin r/006
Expected: Cannot check-in room 006 as first booking is already expired.
-
-
Checking in a room that has a upcoming first booking (i.e. starts after today’s date)
-
Prerequisites: There is a booking in the room you want to check in. Add an upcoming booking to an empty room by doing:
add n/Pikachu p/81726354 e/pika@chu r/011 from/01/12/2018 to/02/12/2018 -
Test case:
checkin r/011
Expected: Cannot check-in room 011 as first booking is not active.
-
-
Refer to the user guide to test more edge cases
| These instructions only provide a starting point for testers to work on; testers are expected to do more exploratory testing. |
H.4. Checkout
First, ensure that you have signed in by doing login user/admin pw/passw0rd.
-
Checking out first booking of a room that is not checked-in
-
Prerequisites: There is a booking in the room you want to check out. Add a booking to an empty room by doing:
add n/Pikachu p/81726354 e/pika@chu r/020 from/16/11/2018 to/20/11/2018 -
Test case:
checkout r/020
Expected: First booking is deleted. Guest of booking is not added into checked-in guest list nor archived guest list.
-
-
Checking out first booking of a room that is checked-in
-
Prerequisites: There is a booking in the room you want to check out. Add an active booking to an empty room by doing:
add n/Raichu p/81726354 e/pika@chu r/021 from/16/11/2018 to/20/11/2018and check-in by doingcheckin r/021 -
Test case:
checkout r/021
Expected: First booking is deleted. Guest Raichu is removed from the checked-in guest list as he does not have any other checked-in bookings, and is added to the archived guest list.
-
-
Checking out specified booking of a room that is not checked-in
-
Prerequisites: There is a booking in the room you want to check out. Add a booking to an empty room by doing:
add n/Pichu p/81726354 e/pika@chu r/022 from/16/11/2018 to/20/11/2018 -
Test case:
checkout r/022 from/16/11/18
Expected: Booking is deleted. Guest Pichu is not added into checked-in guest list nor archived guest list.
-
-
Refer to the user guide to test more edge cases
| These instructions only provide a starting point for testers to work on; testers are expected to do more exploratory testing. |
H.5. Reassign
First, ensure that you have signed in by doing login user/admin pw/passw0rd.
-
Reassigning a booking to another room
-
Prerequisites: There is a booking in the room you want to reassign. Room 001 with its preloaded bookings and expenses is a good example to test this.
-
Test case:
reassign r/001 from/16/11/18 nr/030
Expected: Booking in room 001 that starts from 16/11/18 is reassigned to room 030 (which has no bookings prior). Expenses from room 001 are also ported over.
-
-
Incorrect commands to try:
-
reassign r/001 from/32/11/18 nr/002(invalid command, no such date) -
reassign r/005 from/12/11/18 nr/101(invalid command, no such new room) -
reassign r/006 from/1/1/18 nr/007(room 006 has no such booking) -
reassign r/006 from/9/11/18 nr/007(cannot reassign booking, because room 006 booking is expired)
-
-
Refer to the user guide to test more edge cases
| These instructions only provide a starting point for testers to work on; testers are expected to do more exploratory testing. |
H.6. Login/ logout
clear
Unable to clear because user is not signed in.
login user/peanuts pw/peanut0
Invalid login account.
login user/admin pw/passw0rD
Invalid password. Password is case-sensitive.
login user/admin pw/passw0rd
Successful login.
clear
Able to clear Concierge.
logout
Sign out of Concierge.
clear
Unable to clear because user is not signed in.
undo
Unable to undo because the revision history was erased.
H.7. List
list -cg
This is the list of guests currently checked-in.
login user/admin pw/passw0rd
Sign in to Concierge.
add n/Pikachu p/81726354 e/pi@ka.chu r/059 from/16/11/2018 to/20/11/2018
Add a booking to Concierge.
checkin r/059
Checks in Pikachu to Concierge.
list -cg
Pikachu is added to the list of checked-in guests.
list -r
This is the list of rooms and bookings. The room view is the default view of
Concierge™.
list -g
This is the view of archived guests. It contains people who have ever checked
out of Concierge.
checkout r/059
Checks out Pikachu from Concierge.
list -g
Pikachu is added to the list of archived guests.
H.8. Find
find -g n/Alex Yu
Find guest(s) with "Alex" or "Yu" or both in their names.
find -g n/Alex t/VIP
Find guest(s) named Alex with tag "VIP".
find -cg p/81027115
Find checked-in guest(s) with phone number "81027115".
find -cg t/VIP
Find checked-in guest(s) with tag "VIP".
find -r r/085
Find room 085
find -r c/2
Find all rooms with a capacity of 2.
find -r c/5 -nb from/ 01/11/2018 to/ 05/11/2018
Find all rooms with a capacity of 5, without any bookings from the date range 01/11/2018 to 05/11/2018.
find -r -hb
Find all rooms with bookings.
find -r -hb t/RoomService
Find all rooms with bookings with tag "RoomService".
| These instructions only provide a starting point for testers to work on; testers are expected to do more exploratory testing. |
H.9. Service
This section assumes that the default Concierge is being used.
select 1
The room details panel should be displayed on the right.
service r/001 no/RS01
Unable to execute as user is not signed in (assuming user did not already sign in).
login user/admin pw/passw0rd
Successful login.
service r/001 no/RS01
Expense was successfully added to the room. Notice that the right panel shows the
updated expenses.
undo
Previously added expense was removed, as seen in the right panel.
redo
Expense is added back.
service r/001 no/RS02 c/123.45
Expense was successfully added to the room. Note that the cost is 123.45.
service r/001 no/XX01 c/-5.00
Expense was successfully added to the room. Note that the total cost decreased.
service r/001 no/abcde
No such item in the menu, command cannot be executed.
service r/001 no/RS03 c/123
Money not in correct format, command cannot be executed. There are many different
failing conditions for the money format, they will not all be listed here.
service r/002 no/RS01
No guests in room 002, command cannot be executed.
service r/999 no/RS01
Invalid room number, command cannot be executed.
checkout r/001
Expenses are deleted in the right panel.
H.10. Launch and Shutdown
-
Initial launch
-
Download the jar file and copy into an empty folder
-
Double-click the jar file
Expected: Shows the GUI with a set of sample contacts. The window size may not be optimum.
-
-
Saving window preferences
-
Resize the window to an optimum size. Move the window to a different location. Close the window.
-
Re-launch the app by double-clicking the jar file.
Expected: The most recent window size and location is retained.
-
{ more test cases … }
H.11. Saving data
-
Dealing with missing/corrupted data files
-
{explain how to simulate a missing/corrupted file and the expected behavior}
-
{ more test cases … }